Wes’s Onex #89
Posted: Thu Oct 24, 2019 1:33 am
by WesRagle
Hi Guys,
Since Bryan pointed out that I had asked too many questions in my “A couple of questions” thread, I thought I’d start a new thread where I could ramble about my build and ask an unlimited number of questions ![]()
I am working my way through wiring the airplane. The wiring is fairly simple because my panel/plane is fairly simple. Today I decided to test the power distribution so I hooked up a bench supply in place of the battery (so I could limit the current) and plugged in the panel and lit it up.
I did have one problem. Not all pins of the GPS push pin connector were making contact. In particular the 12 VDC pins weren’t making contact. I shimmed the top of the connector with a couple of thin washers and that fixed the problem.
I am disappointed with the master relay.
This thing draws about 3/4 of an amp (9 Watts and gets quite hot!). That’s almost twice what the instrument panel draws! I should have read the spec sheet before making a selection.
Forever Forward,
Wes
Re: Wes’s Onex #89
Posted: Thu Oct 24, 2019 8:20 am
by Bryan Cotton
Since Bryan pointed out that I had asked too many questions in my “A couple of questions” thread, I thought I’d start a new thread where I could ramble about my build and ask an unlimited number of questions
Excellent, I was getting worried that my life had no real purpose.
WesRagle wrote:I am disappointed with the master relay. This thing draws about 3/4 of an amp (9 Watts and gets quite hot!). That’s almost twice what the instrument panel draws! I should have read the spec sheet before making a selection
Wes, very cool you are starting the electrical and smart of you to do a power on test. I selected a zero amp relay which you can find in my build thread. Also Bob Meyers has mentioned he selected a low power relay which was pricey but drew a small amount of amps.
Re: Wes’s Onex #89
Posted: Thu Oct 24, 2019 9:15 am
by WesRagle
Hi Bryan,
Excellent, I was getting worried that my life had no real purpose.
Tuition, books, building use fees, parking … ? Chop chop ![]()
Wes
Re: Wes’s Onex #89
Posted: Thu Oct 24, 2019 1:43 pm
by WesRagle
Hi Guys,
Still working on the wiring. I hooked up the sensors to the EIS. Right now all I can check are the thermal sensors.
A while back we were discussing how sensitive (or not) the Oil Temp sensor is to thermal conditions external to the engine. Not to beat the dead horse too much but…
The Oil Temp sensor has long since been screwed into the engine. A quick 4 second blast with the heat gun resulted in an almost immediate eight Fahrenheit degree increase in reading. Eventually the indication increased 11 degrees before starting to decrease.
Wes
Re: Wes’s Onex #89
Posted: Sun Nov 03, 2019 2:26 pm
by WesRagle
Hi Guys,
Things are getting a bit serious.
I did the fuel flow test. The results were just OK. With the small valve and using #4 fittings forward of the firewall I was getting between 9 and 10 GPH on the last gallon of fuel with a deck angle of 16 Deg.

Firewall forward is pretty much finished. So, I put oil in the engine, oiled the lifters, and spun the engine with the starter. It took between 10 and 15 seconds but I did pick up oil pressure. I let the starter cool and the spun it for another 15 seconds to circulate the oil.
I decided to bring the battery back up to max and put the prop on in preparation for first engine start. I was a little surprised that the Sonex spinner does not allow room for a socket over the bolt heads.?.?
So, what did you guys do? I’m thinking an internal tooth lock washer under the bolt heads.
Anyway, if I can get a good engine run, it will be a race to the finish.
Wing Stubs, Wing Tips, Rig outer wings, Seat Cushion, Baggage compartment, … Getting kind’a close.
Thanks,
Wes
Re: Wes’s Onex #89
Posted: Sun Nov 03, 2019 5:41 pm
by Rynoth
Try a different socket on the heads? I don’t have the plans in front of me but I have no issue getting a deep-socket on my prop bolts through the hub, which AN- bolts did you use? I believe I used AN5-42A with 3 washers (slightly shorter bolt may have also worked.)
I don’t think lock washers are a good idea on the prop bolts, you will be re-torquing them frequently/seasonally and really should get a wrench/ratchet on the bolt heads for this. Don’t forget to add the nylock resistance torque to the recommended torque, and use your torque wrench on the nut-side. I was a bit surprised just how much re-torquing was needed during my first 10 flight hours.
Re: Wes’s Onex #89
Posted: Sun Nov 03, 2019 7:18 pm
by WesRagle
Hi Ryan,
Thanks for the reply.
They are the bolts that came with the prop. AN5 I believe. It took three washers for mine as well. I will re-torque on the nut side of the prop and wouldn’t have lock washers there. I happen to have two spinners, an older solid one and a newer hollow one. Since I didn’t remember any such problem while building the Sonex I went out to the shop and checked, and sure enough, the counter bore in the solid spinner was larger. Presumably the smaller counter bore in the new spinner would allow more material to be removed from the center of the billet.?.?
In the meantime I found an old 1/2" nut driver and ground it down until it would fit the counter bore of the new spinner. Hard to see in pictures, but there is a lot more room for a socket in the old spinner.
Ground down nut driver in the new spinner counter bore:
Ground down nut driver in the old spinner counter bore:
My son says a SnapOn socket would have worked just fine.
Wes
Re: Wes’s Onex #89
Posted: Wed Nov 06, 2019 12:40 am
by WesRagle
Hi Guys,
I was going to run the engine for the first time today just to see it run and to make sure all sensors were working and the readings were in the ball park. However, it was mucky out today so I couldn’t talk myself into it. Maybe in a couple’a three days when the weather clears.
In the mean time I decided to do some of the things I had been putting off.
Installed the map pocket (thanks Graeme). I was also fretting about how to route the headset wires, the antenna wire, PPT wires etc. Wire routing options are limited with no upholstery on the sides. What I ended up doing was just tacking the wires into the crotch of the longerons etc with hot glue. Not really that noticeable. BTW, the hot glue seemed to bond better if I heated the aluminum some where the tack was going to be placed.
Since I’m using a hand held radio, I just purchased a headset extension wire so I could locate the sockets behind me to keep the wires out of my lap. The problem was how to mount the plugs. It turned out to be pretty easy. A bracket with four 1/2" holes, bends in the appropriate place, and notch out the bottom two holes so the wires can slide in. Turned out better than I thought it would. The two small holes were for a zip tie. Turns out I didn’t have to zip tie it. Just over bend it a bit and the sockets snap firmly into place.
I went ahead and wired the PTT switch and put my fancy (wink wink) stick grip in place. Ref. https://www.aircraftspruce.com/catalog/elpages/p1momswitch.php?clickkey=8638. I used the threaded bezel with a red button. The O.D. of the bezel is exactly the O.D. of the stick. I didn’t even have to attach the button to the stick. I just set the button on top of the stick, applied soapy water to the stick and inside of the grip and slid/forced the grip over it. The hole in the end of the grip did have to be enlarged to allow the button to clear it. The button has a good feel. I like it.
I still need some inspiration as far as the baggage compartment is concerned.
Forever Forward,
Wes
Re: Wes’s Onex #89
Posted: Wed Nov 06, 2019 4:08 am
by dirkverdonck
Hi Wes,
I fabricated a removable bagage compartment in Alu sheet that is attached to the frame with nutplates. The bottom is in plywood and can be easily lifted to inspect the elevator idler system.
This way, I maximised the bagage space and the weight of it is relatively low.
(To be done before you close up the floor of the aft fuselage!!)
Re: Wes’s Onex #89
Posted: Wed Nov 06, 2019 4:06 pm
by WesRagle
Hi Dirk,
OK, I’m in. If you have any more pics It would be appreciated. I don’t know how to apply nutplates to the main cross tie box. I haven’t riveted the bottom on yet. I will wait to fabricate the baggage box until after I build the wing stubs just to make sure I don’t interfere with the rear spar.
Anyway, any more details you can share would be great!
Thanks a Bunch,
Wes
Re: Wes’s Onex #89
Posted: Fri Nov 08, 2019 1:29 pm
by dirkverdonck
Hi Wes,
I installed nutplates in the main cross tie box before closing it up and also a row on the top of the first cross member. I then measured and cut the forward and rear sheets, adding a lip to the top and bottom facing opposite directions; the top lip to the outside of the box so the box ‘hangs’ on the lips and is secured in place with the nutplates, the bottom lip will hold the plywood bottom plate. On the vertical side, I folded lips to the inside of the box and added nutplates to the back of them to hold the sideplates.
I then measured the size of the sideplates and added a large lip on top folded to the outside to close the gap between the sidewall and the box and lips on the bottom side facing inwards to hold the bottom plywood sheet.
Once all for side are installed, you will have four bottom lips surrounding the box that will hold your plywood sheet in which I drilled a hole and inserted a piece of rope with a nut underneath to pull the sheet upward for inspection purposes.
As my box is already installed and I have no more pics available, this is the only information I can add.
Make sure you measure at least four times before you cut any metal as the box is not square but has a conical shape!
Re: Wes’s Onex #89
Posted: Sat Nov 09, 2019 12:28 am
by WesRagle
Hi Dirk,
Thanks a lot. I have read and will re-read. I’ll improvise and adapt to fit my situation.
Speaking of measure trim remeasure and trim again … I’m still doing little things that I’ve been putting off.
I decided long ago that I wanted to try and streamline the landing gear. I did that but…, I have been ignoring the fact that the fairing just ended at the upper bend in the landing gear. Today was the day of reckoning.
I spent almost all day going from this:
To this:
Times two.
It’s a little bit cheesy but I had to do something. I’m still not finished but getting close. Even when I’m finished I won’t be finished ![]() I need to make a small fiberglass fairing to cover the intersection of the two sheet metal fairings. I’m getting a bit weary of my “good ideas”.
I need to make a small fiberglass fairing to cover the intersection of the two sheet metal fairings. I’m getting a bit weary of my “good ideas”.
I also installed the NACA duct for cabin air and plumbed it to the eyeball. The NACA was fitted long ago just not installed.
Forever Forward,
Wes
Re: Wes’s Onex #89
Posted: Sat Nov 09, 2019 9:02 am
by Bryan Cotton
Wes,
Nice. You are as nuts as I am!
Re: Wes’s Onex #89
Posted: Sat Nov 09, 2019 11:58 am
by inventor
I have my landing gear bolted on too but now have to remove to rivet the wing skins.
Re: Wes’s Onex #89
Posted: Sat Nov 09, 2019 1:46 pm
by lgsievila
Seems like a lot of work to pull the gear off for 6 rivets-3 on each side. You might consider as Wes mentioned to put the rivets at the gear location in backwards(heads inside the wing rib). One other consideration might be structural epoxy like 3M 2216 in that location. I am using 2216 on a current build as recommended by the designer and it is used in many structural connections with no other mechanical fasteners.
Re: Wes’s Onex #89
Posted: Sat Nov 09, 2019 2:20 pm
by inventor
There is always another way to skin a cat. I am going to remove my gear though and take advantage of the opportunity to counter bore the gear bolt holes that don’t seat down flush because of interference with the web of the attachment angles. Thanks for the suggestions.
Re: Wes’s Onex #89
Posted: Sat Nov 09, 2019 4:50 pm
by WesRagle
Bryan Cotton wrote:Wes,
Nice. You are as nuts as I am!
Thanks Bryan,
The whole time I was working on the fairings I kept thinking of Bryan’s Bane ![]()
Hi “Inventor”
inventor wrote:I have my landing gear bolted on too but now have to remove to rivet the wing skins.
For me, not this side of eternity. It may be my just reward but I have a little time left. I have considered back riveting but I need to borrow (or buy) a double offset back set rivet set. Anything but remove the gear (again).
inventor wrote:There is always another way to skin a cat. I am going to remove my gear though and take advantage of the opportunity to counter bore the gear bolt holes that don’t seat down flush because of interference with the web of the attachment angles. Thanks for the suggestions.
Counter boring into the fillet of a major structural member of the fuselage doesn’t sound like a very good idea to me. Much easier (and better?) to bevel some washers to conform to the fillet.
And no offense, really, but I wish folks would always use their real name. I keep feeling like I should end this message with 10-4 good buddy.
Wes
Re: Wes’s Onex #89
Posted: Fri Nov 15, 2019 4:29 pm
by WesRagle
Hi Guys,
Well, it was one of those red letter days for me. Finally pulled the Onex out of the shop, tied it to a tree and fired it up.
Haven’t adjusted the jets yet, just wanted to see all indications behave normally so I can start covering up the front of the airplane. With the main jet at it’s “default” setting of 3 1/2 turns out and WOT I was seeing 3180 RPM and EGT of about 1350 with a Prince P-Tip 54-50. I feel pretty good with that.
I did do a quick check of the Carb Heat and got about 25 Fahrenheit Deg. rise @ 2800 RPM. The flapper couldn’t seal all the way with a thermocouple stuck in the front but 25 Deg is probably close. Hope to get another 25 at cruise power with the engine cowled up. We’ll see.
With all wiring/sensors tested, I can finally put the glare shield on so I can put the windshield on, so I can put the …
Forever Forward,
Wes
Re: Wes’s Onex #89
Posted: Fri Nov 15, 2019 5:17 pm
by Rynoth
Congrats Wes! Glad you didn’t put out too much power and uproot the tree on your head =D. So satisfying when you fire the thing up and it WORKS!
Re: Wes’s Onex #89
Posted: Fri Nov 15, 2019 9:19 pm
by Bryan Cotton
Awesome!
Re: Wes’s Onex #89
Posted: Fri Nov 15, 2019 10:06 pm
by WesRagle
Thanks Guys,
Very motivating to hear real airplane noises.
I took care of one more thing I have been putting off.
Pretty terrifying, but in reality not bad at all.
I cut two over-sized holes in a towel, clamped the lexan in place, medium speed and light pressure and voila. I polished the opening with 600 grit.
The most painful part was paying for the hole cutter ![]()
Wes
Re: Wes’s Onex #89
Posted: Sat Nov 16, 2019 10:53 am
by bvolcko38
Where does that oil line go to coming from the oil pump cover?
Re: Wes’s Onex #89
Posted: Sat Nov 16, 2019 2:03 pm
by lgsievila
Hi Wes,
If only you had known-
The most painful part was paying for the hole cutter
I would have carried one down in my suitcase when I come down to your hood to visit my daughter for Thanksgiving.
See you soon my friend!
Re: Wes’s Onex #89
Posted: Sat Nov 16, 2019 6:08 pm
by WesRagle
lgsievila wrote:Hi Wes,
If only you had known-The most painful part was paying for the hole cutter
I would have carried one down in my suitcase when I come down to your hood to visit my daughter for Thanksgiving.
See you soon my friend!
Hey Loren,
Well, I didn’t think of that ![]() Looking forward to your visit.
Looking forward to your visit.
bvolcko38 wrote:Where does that oil line go to coming from the oil pump cover?
Hi Bill,
The line runs to the bottom of a firewall mounted oil cooler. Had I explained to Scott what my plans were, before he built the engine, I think I could have had a neater installation. However, I didn’t think far enough ahead so I just gritted my teeth and made the necessary run. The air to the oil cooler will be supplied by a NACA vent on the cowl side. I’ll use the exhaust of the oil cooler for cabin heat.
Preliminary firewall layout. It didn’t end up this way but you can see how the oil cooler is mounted.
Oil cooler as mounted.
This pic shows the air supply for the oil cooler.
A similar setup worked well on the Sonex so I expect it to work well again. We’ll see.
I wish one of the guys that live in the permafrost region, and is having trouble getting enough cabin heat in the winter, would give this a try. And, instead of blocking off part of the oil cooler in the winter, just plum in a heat muff ahead the oil cooler.
Different subject:
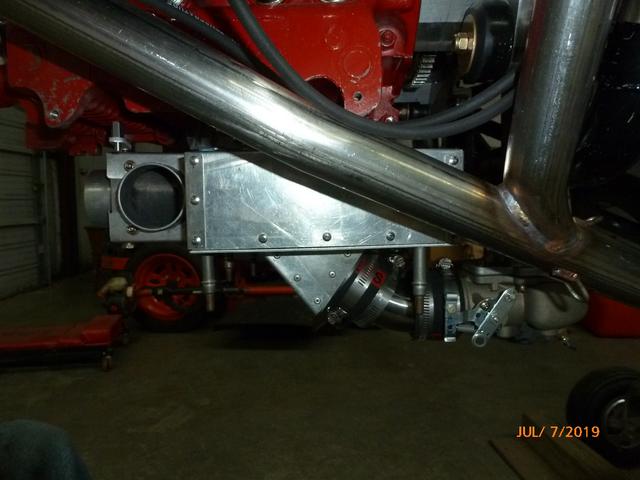
I think I have an interference problem with my induction system ![]()
Seriously, I have a question: Do any of you guys have a good feel for how much the front of the engine moves around?
Thanks,
Wes
Re: Wes’s Onex #89
Posted: Sat Nov 16, 2019 7:50 pm
by Bryan Cotton
Seriously, I have a question: Do any of you guys have a good feel for how much the front of the engine moves around?
I don’t yet. I suspect I’ll know by how much damage my baffles take while running.
Re: Wes’s Onex #89
Posted: Mon Nov 18, 2019 12:05 pm
by inventor
Did you build the oil cooler or is it an off the shelf unit?
Re: Wes’s Onex #89
Posted: Mon Nov 18, 2019 2:26 pm
by WesRagle
inventor wrote:Did you build the oil cooler or is it an off the shelf unit?
Who’s asking?
Ref. http://sonexbuilders.net/ucp.php?i=profile&mode=signature
Wes
Re: Wes’s Onex #89
Posted: Wed Nov 20, 2019 9:42 pm
by WesRagle
Hi Guys,
I’m still moving along (at a glacial pace).
I covered and installed the glare shield and fuel vent. I may regret the covering the first time I spill fuel but I shall endeavor not to spill.
I also did some final trimming on the cowl. Since nobody would venture a guess as to the movement of the engine relative to the cowl, I made a guess. 1/4" top and sides and 1/3" on the bottom for a firm landing. I’ll just have to keep an eye on it to see if that’s adequate. I will attempt a jam seal (form the back) around the induction tube using a block of foam. If that doesn’t work I’ll come up with something else. Maybe try a more refined approach once the plane is flying and I need something to do.
I need to order fasteners. I prefer quarter turn fasteners. I’m thinking of these https://store.skybolt.com/phillips-sk28s3-series-c1207.aspx. Any advice appreciated.
BTW, UPS just delivered a sheet of 0.016. Now I have no excuse not to attack the baggage compartment.
Thanks,
Wes
Re: Wes’s Onex #89
Posted: Thu Nov 21, 2019 12:10 am
by wlarson861
When I changed engines and cowl I used the Skybolt fasteners. The adjustable receiver is worth the higher price. I have had to replace a couple of the cams. The locking pin fell out of two of them, one I found and re-staked it in the cam and it has held. suggest buying a couple extra along with a good supply of the retainer rings as they will pop off from time to time.
Re: Wes’s Onex #89
Posted: Thu Nov 21, 2019 1:16 am
by WesRagle
Hi Bill,
Thanks for the reply.
I have a couple of questions.
In a recent “Shop Talk” article Robbie Culver stated:
I used SkyBolt fasteners, which were not cheap but certainly are high-quality
quick removal fasteners for the cowling. I was slightly disappointed at the
supporting documentation for these, as installation instructions were a bit less
than expected. I figured it out, but not very quickly. There are specialized tools
required also, so anyone going this route please reach out to me for loaners.
That leaves me a little concerned.
Also, in the “Engine Swap” podcast Robbie said that his cowl spit out one of the fasteners in flight which he speculated was the cause of a ding he got in his prop.
Questions:
- What are the specialized tools that are required for installation?
- Which retainers should be used with the Phillips SK28S3 Series studs (ref: https://store.skybolt.com/retaining-rings-c1213.aspx)?
- The thickness of the cowl haves is pretty uniform along the sides (where most of the fasteners go). So, what is the advantage of adjustable receivers?
- When you say “the locking pin” are you referring to the pin in the end of the stud?
Thanks for Your Time,
Wes
Re: Wes’s Onex #89
Posted: Thu Nov 21, 2019 1:17 pm
by Onex107
WesRagle wrote:Hi Guys,
I’m still moving along (at a glacial pace).
I covered and installed the glare shield and fuel vent. I may regret the covering the first time I spill fuel but I shall endeavor not to spill.
I also did some final trimming on the cowl. Since nobody would venture a guess as to the movement of the engine relative to the cowl, I made a guess. 1/4" top and sides and 1/3" on the bottom for a firm landing. I’ll just have to keep an eye on it to see if that’s adequate. I will attempt a jam seal (form the back) around the induction tube using a block of foam. If that doesn’t work I’ll come up with something else. Maybe try a more refined approach once the plane is flying and I need something to do.
I need to order fasteners. I prefer quarter turn fasteners. I’m thinking of these https://store.skybolt.com/phillips-sk28s3-series-c1207.aspx. Any advice appreciated.
BTW, UPS just delivered a sheet of 0.016. Now I have no excuse not to attack the baggage compartment.
Thanks,
Wes
Don’t joke about spilling fuel. The smallest drop on your windshield will cause it to crack. Take every precaution to prevent spills. I have added a peel and stick black plastic cover around the hole to catch drips. I use car gas and have added a battery powered pump to transfer gas to have more control. I have a major crack next to the hole and the windshield needs to be replaced. If you spill enough to cause it to run down around the glare shield, it will cause many small cracks in the edge of the windshield. Nasty problem. This should be printed in red in the instructions.
Re: Wes’s Onex #89
Posted: Thu Nov 21, 2019 2:28 pm
by WesRagle
Hi Maurice,
Onex107 wrote:Don’t joke about spilling fuel.
I wasn’t joking. I’ve already bought my first fuel transfer system. I knew I needed one and just went ahead and bought it to help with the fuel flow test and fuel level calibration. Gordon Baxter suggested it. Thanks Gord.
Future plans include a fuel transfer tank mounted in the back of my old pickup. That will require some thought to do it right ![]()
I am curious if the crazing/cracking of lexan is related to how well the cut edges are polished out. I think I’ll take a little more time and polish the hole and cut edges down to 2000 grit.
BTW, I read your article in Air Facts (Ref. https://airfactsjournal.com/2019/11/escape-from-the-jaws-of-imc/).
Excellent article. I admire folks who can write. I majored in engineering just because it required one less semester of English. Another indication that I don’t always think things through all the way ![]()
Thanks,
Wes
Re: Wes’s Onex #89
Posted: Thu Nov 21, 2019 4:47 pm
by WaiexN143NM
Hi wes,
The skybolt fasteners are great. dont forget the special tools you will need from them for install. inside alum backing plates inside really stiffen up the joint. I prefer to use pan head rivets on the cowl instead of countersunk. Also i used contego fire barrier(aircraft spruce) on the inside of cowl. looks and smells like white latex paint. with a fire barrier additive.
You’ve got a nice quality build. Keep plugging away!
WaiexN143NM
Michael
Re: Wes’s Onex #89
Posted: Thu Nov 21, 2019 5:20 pm
by Sonex1517
Hello
Since I was quoted here, I will chime in.
I used the following parts:
SK213-2 Receptacle
ZG28S3-2 fastener
SK2600-LWS fancy washer (Bill is correct. Buy extras)
4P3-T26 Stupid expensive tool to push fancy expensive washers onto fasteners
SK245-PK silly expensive tools used to fuss with fancy expensive washers and receptacles
I am willing to LOAN them with the clear understanding they are to be returned.
As far as what happened to my prop - no idea what actually happened, but it is likely a fastener popped a fancy expensive washer and flew out into the rear face of my prop. That or a rock on the runway.