Rudder Trim
Posted: Fri Jan 13, 2023 1:14 am
by Skippydiesel
I need to apply a small trim force to achieve a little bit of right rudder.
I would like your advice on the following;
Dimensions of trim tab (including wedge style that might have worked). I hope to keep my trim tab as small/discreet as is effectively possible.
Most effective location on rudder.
I intend to temporarily stick my trim tab in place using double sided tap. Once the most effective size/bend/location has been found it will be riveted in place.
I am sure many of you have been down this track before me, so please be generous with your experience/advice.
Re: Rudder Trim
Posted: Fri Jan 13, 2023 3:23 am
by sonex892.
Hi Skip.
My Sonex with a Jab 3300 needs a lot of right pedal on climb out and cruise. I have tried 3 things.
Firstly an adjustable spring to add forward force to the right rudder pedal. Worked good at speed but if it wasnt released before landing things got interesting. I removed this on a weight reduction campaign a while back.
Secondly tried numerous lengths and widths of a balsa wedge. Could not get enough rudder force at speed with the wedge. For aesthetics the wedge would have been my first choice but it just wasnt good enough. If you only need a small amount force a wedge might be enough.
Third was an aluminium trim tab. This gave the best result. I still need heaps of right rudder during full power at climbout but at cruise its good. I think the tab is about 200mm long. I’ll be flying in the morning so will try to remember to measure it. For figuring out the length location and bend I used double sided tape and duct tape for testing flights with both the wedge and tab. I have had the tab rivetted on for about 5 years now.
Steve
Re: Rudder Trim
Posted: Fri Jan 13, 2023 6:24 am
by sonex1566
Hi Skip,
I used to think that it was just me, however I have seen a few others with exactly the same issue. I experimented starting with tiny and gradually growing bigger and bigger. I reckon that mine is around 7" long x 1 1/2" bent out into the airflow. If it was a model plane I’d stick a couple of washers behind the engine mount to give it some right thrust…I tried it with the Jab, but the prop drive looked stupid about an inch off centre in the cowling. If I was really motivated I would have a go making another engine mount with a few degrees right thrust but the prop still in the middle. However the cost of 4130 especially the square tube is bloody high in Australia and my motivation is rather low…The option for the time being is to stand in front of the trim tab if someone takes a picture.
Re: Rudder Trim
Posted: Fri Jan 13, 2023 7:31 am
by Skippydiesel
sonex892. wrote:Hi Skip.
My Sonex with a Jab 3300 needs a lot of right pedal on climb out and cruise. I have tried 3 things.
Firstly an adjustable spring to add forward force to the right rudder pedal. Worked good at speed but if it wasnt released before landing things got interesting. I removed this on a weight reduction campaign a while back.
Secondly tried numerous lengths and widths of a balsa wedge. Could not get enough rudder force at speed with the wedge. For aesthetics the wedge would have been my first choice but it just wasnt good enough. If you only need a small amount force a wedge might be enough.
Third was an aluminium trim tab. This gave the best result. I still need heaps of right rudder during full power at climbout but at cruise its good. I think the tab is about 200mm long. I’ll be flying in the morning so will try to remember to measure it. For figuring out the length location and bend I used double sided tape and duct tape for testing flights with both the wedge and tab. I have had the tab rivetted on for about 5 years now.
Steve
Hi Steve,
I like the idea of a balsa wedge - did you have it for the full length(high) of the rudder trailing edge? What was the x sectional dimensions?
With your tab;
Dimensions - 200mm x ??mm. Please include mounting dimensions as well as slip stream.
Location - Where on the rudder did you end up placing your tab?
Re: Rudder Trim
Posted: Fri Jan 13, 2023 7:35 am
by Skippydiesel
sonex1566 wrote:Hi Skip,
I used to think that it was just me, however I have seen a few others with exactly the same issue. I experimented starting with tiny and gradually growing bigger and bigger. I reckon that mine is around 7" long x 1 1/2" bent out into the airflow. If it was a model plane I’d stick a couple of washers behind the engine mount to give it some right thrust…I tried it with the Jab, but the prop drive looked stupid about an inch off centre in the cowling. If I was really motivated I would have a go making another engine mount with a few degrees right thrust but the prop still in the middle. However the cost of 4130 especially the square tube is bloody high in Australia and my motivation is rather low…The option for the time being is to stand in front of the trim tab if someone takes a picture.
Hi 1566,
Your tab may be slightly smaller than Steve’s at 200mm x ??mm. What are the dimensions of the bit securing the airflow bit to the rudder?
Re: Rudder Trim
Posted: Fri Jan 13, 2023 7:52 am
by GraemeSmith
Sonex have a part:
https://www.sonexaircraft.com/eshop/car … ing=rudder
Comes with a suggested dimension/placement on the trailing edge of the rudder.
–
Mine is adjusted for neutral rudder in level trimmed flight.
So with an Aerovee - it is still left rudder on climb and right rudder on dive - but in level flight - I can take my feet off.
Re: Rudder Trim
Posted: Fri Jan 13, 2023 10:44 am
by DCASonex
Flying behind a Jabiru, then a CAMit 3300 for last ten years. Just adjust rudder tab for level cruise. Holding left rudder during rotation and climb becomes second nature after a few takeoffs.
David A.
Re: Rudder Trim
Posted: Fri Jan 13, 2023 11:17 am
by builderflyer
I followed Dave Anders’ fastest RV-4 example of using a Gurney flap for rudder trim. It’s 6" (152mm) tall and 5/8" (16mm) wide which provides enough rudder deflection at cruise speed for no feet required to keep the ball centered. It’s located mid span for greater effectiveness and is permanently held on with double sided tape (no need for rivets).
Works for me,
Art,Sonex taildragger #95,Jabiru 3300 #261
Re: Rudder Trim
Posted: Fri Jan 13, 2023 11:37 am
by gammaxy
builderflyer wrote:Dave Anders’ fastest RV-4 example of using a Gurney flap for rudder trim
Art,
That’s a very interesting trim tab design. Thanks for sharing, I need to learn more about this Gurney flap trim tab technology.
Re: Rudder Trim
Posted: Fri Jan 13, 2023 6:04 pm
by Skippydiesel
builderflyer wrote:
Dave Anders’ fastest RV-4 example of using a Gurney flap for rudder trim
I hate making additionals holes in my Sonex so the fact that I can get the tab to stay on temperamentally with double sided tape is great news.
Your tab closely resembles a short length of aluminium angle, that I can get from my hardware store. How thick is it?
Re: Rudder Trim
Posted: Fri Jan 13, 2023 7:18 pm
by sonex892.
Skippydiesel wrote:
Hi Steve,I like the idea of a balsa wedge - did you have it for the full length(high) of the rudder trailing edge? What was the x sectional dimensions?
With your tab;
Dimensions - 200mm x ??mm. Please include mounting dimensions as well as slip stream.
Location - Where on the rudder did you end up placing your tab?
The 200mm tab length was a guess. It actually measured 165 x 17 x 30 see placement on photo
The balsa wedge was a long time ago but I think I started long, maybe 18". I did try various locations high and low on the rudder but couldnt get a good enough result. I bought the balsa from bunnings.
Steve

Re: Rudder Trim
Posted: Fri Jan 13, 2023 10:12 pm
by builderflyer
Skippydiesel wrote:builderflyer wrote:
Dave Anders’ fastest RV-4 example of using a Gurney flap for rudder trimI hate making additionals holes in my Sonex so the fact that I can get the tab to stay on temperamentally with double sided tape is great news.
Your tab closely resembles a short length of aluminium angle, that I can get from my hardware store. How thick is it?
My Gurney flap rudder trim was bent up from a scrap of 0.025" thick aluminum. Clean the aluminum well, say with lacquer thinner, before applying the double sided tape and it’ll virtually “never” come off in use. The trim will be difficult to remove, but not impossible, should you choose to take it off at a later time.
Art,Sonex taildragger #95,Jabiru 3300 #261
Re: Rudder Trim
Posted: Sat Jan 14, 2023 3:09 am
by Skippydiesel
Sonex 892,
Interesting location - why so low on the rudder?
I have just installed my MK1 tab and have located it exactly 1/2 way - used a peace of 200 x 30 x 1.5 mm curved ) aluminium profile. 15 mm sticks out into the slip stream. Yet to test fly.
Re: Rudder Trim
Posted: Mon Jan 16, 2023 8:38 pm
by Skippydiesel
Mk1 over corrected just a “tad”. Have removed and cut in 1/2 (now 100mm). Will refit and test again.
Re: Rudder Trim
Posted: Tue Jan 17, 2023 11:28 am
by John Monnett
Over the years and a bunch of aircraft I have used a simple method to determine the size of trim tabs. A length of a common soda straw is taped to the trailing edge of the surface on the side you want to deflect. Make an educated guess as to the length,(say 8 to 6") and test fly. trim the length to adjust. Once you’ve got it right, then make an aluminum tab to match.
Re: Rudder Trim
Posted: Wed Jan 18, 2023 2:30 am
by Skippydiesel
Mk2 works well BUT as you experienced builder/pilots will know, an adjustment to one control surface will impact on another;
Now have a left wing drop - did have the left flap up as far as it would go, to correct an earlier right wing drop. Have now turned left wing flap down by 1/2 turn of control rod end. Hope to test fly, in the cool of the early morning, tomorrow.
Re: Rudder Trim
Posted: Wed Jan 18, 2023 11:34 am
by GraemeSmith
To my mind you should be rigging the plane to fly straight and level with the pilot sitting in the center of the cockpit. Easy in an Onex. Less so in a Sonex/Waiex. This to represent a pilot/passenger situation. Once that is achieved you can sit on the left. At that point the plane will appear to be “left wing heavy” - but it’s not really - just it is out of roll trim because of your weight. At that point you can apply some kind of trimming to the stick to get the plane to roll level. You should not be adjusting control surfaces or they will be “wrong” when a passenger is aboard and also sets you up for unequal yaw characteristics.
In my Sonex - the one thing the builder had not tackled was the rudder trim - professing to just leave his slightly heavy left foot on the rudder. Once I got the rudder trim sorted for level flight - I then DID sit centerline and make sure left and right flaps and ailerons were equally rigged and the plane was flying level. (as well as dimensioning the wingtips to be sure the plane was “square”).
With that done - I sat left seat and yes the plane appeared to be left wing heavy. I then used differing weights of bungee on the stick till I found the one to “trim” away the condition. I’ve arranged it so that if I fly solo - I hook the bungee on. If I have cargo or a passenger - I unhook the bungee.
YMMV
Re: Rudder Trim
Posted: Wed Jan 18, 2023 11:47 am
by Bryan Cotton
Graeme,
I’d like to see your aileron bungee picture. My son and I weigh the same so we are rigging for two-up. But solo I fly from either seat and want to implement something.
Re: Rudder Trim
Posted: Wed Jan 18, 2023 6:25 pm
by racaldwell
I also use a bungee but I use it as a supplement to the elevator trim. My spring bias elevator trim does not have the range to trim across 40 to 135 kts. So the bungee is between the seat cushions and I have a cleat on a clip positioned over the seat pan front edge in the center above the spar tunnel. The other end of the bungee is connected to the bellcrank at the rear of the seat pan. This solved my trim range issue.
The cleat came from my old windsurfer junk. The cleat makes it easy to remove or adjust bungee tension.
Rick Caldwell
Xenos 0057 The Air Yacht
Re: Rudder Trim
Posted: Wed Jan 18, 2023 6:29 pm
by GraemeSmith
Looking down directly into cockpit of Legacy/A Sonex
Seat Pan removed.
Front of aircraft is at top of picture
Twin Stick
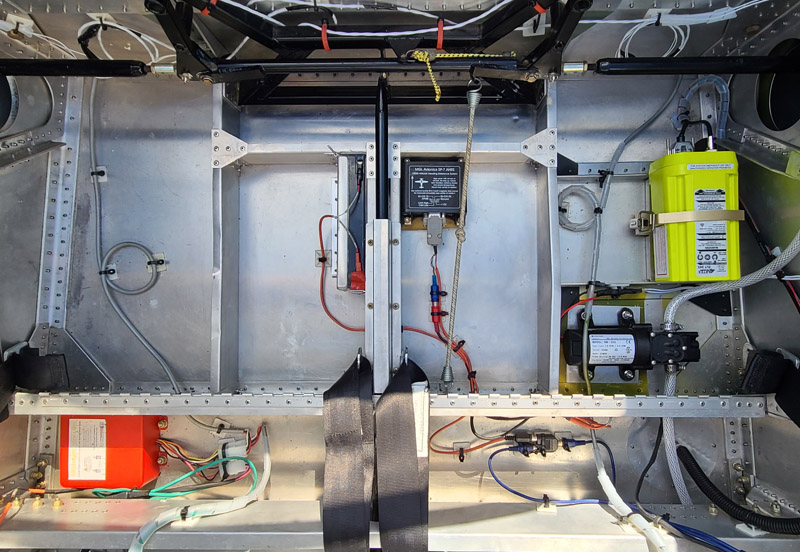
1.jpg (176.88 KiB) Viewed 2544 times
Detail of stick. The Yellow Bungee hooks together two eyes (arrowed) in the stick system applying slight right roll.
Once in the ballpark with a weight of bungee - the “fine tuning” was by adding knots to the bungee to set the length / tension.
2.jpg (73.19 KiB) Viewed 2544 times
To hook or unhook depending on passenger - I remove the stick boot cover (which is held in place with Velcro) and reach in and hook or unhook. VITAL that this is set up that if bungee breaks or is in “unhook” mode there is NO chance that the bungee can jam controls.
Re: Rudder Trim
Posted: Wed Jan 18, 2023 7:03 pm
by Bryan Cotton
Thanks Graeme! I am going to set mine up to fly from either seat. I’ll share what I come up with. I hadn’t thought of under the seat. My boots are also fastened with velcro.
Re: Rudder Trim
Posted: Wed Jan 18, 2023 7:16 pm
by GraemeSmith
racaldwell wrote:I also use a bungee but I use it as a supplement to the elevator trim.
In my first picture you can see a white bungee going up and down under the seat pan. Builder told me that was an “anti-flutter/damper” for the elevator - but it would also help with the trim. My trim is manual.
Re: Rudder Trim
Posted: Thu Jan 19, 2023 12:04 am
by Skippydiesel
Hi Graeme,
You are lucky that you have so many passengers/copilots, that you must configure your Sonex for the load.
In my case I expect (based on history) to probably fly alone for 90+% of the time. I trimmed my last aircraft to cruise hands/feet off with just me on board. I had a pilot adjustable lateral trim bungee, that only acted on the right aileron rod. Very KISS and very effective in trimming for passenger weight.
I will be configuring my Sonex in the same way.
I cant see how trimming for an equal left/right load will be of any benefit UNLESS you intend having lateral trim on both ailerons - more complexity.
Re: Rudder Trim
Posted: Thu Jan 19, 2023 9:32 am
by bvolcko38
Just a dumb question… Could the rudder trim issue be better addressed by some engine thrust line adjustment?
Re: Rudder Trim
Posted: Thu Jan 19, 2023 10:08 am
by Bryan Cotton
bvolcko38 wrote:Just a dumb question… Could the rudder trim issue be better addressed by some engine thrust line adjustment?
Possibly - but that would 1) be a lot of work and 2) mess up the prop/cowl alignment (which would also generate a lot of work.)
My trim is much like Graeme’s:
GraemeSmith wrote:So with an Aerovee - it is still left rudder on climb and right rudder on dive - but in level flight - I can take my feet off.
I am going to wait until I have the flaps/roll trim squared away before I tackle rudder trim. Mine is pretty close in cruise. I don’t have springs on my pedals so I could add a single spring or bungee.
Re: Rudder Trim
Posted: Thu Jan 19, 2023 11:51 am
by GraemeSmith
Skippydiesel wrote:I cant see how trimming for an equal left/right load will be of any benefit UNLESS you intend having lateral trim on both ailerons - more complexity.
Well if I was to fly right seat on my own - I’d just hook the bungee up on the other side.
–
What follow is OPINION based on some scenarios I have seen with planes that were not rigged correctly…
As a general principle - I don’t like the idea of putting a plane “out of rig” to get it to fly straight. “Evenly loaded” Fore and aft and athwartships - control surfaces should be symmetrical or even with each other and the plane should fly straight - hands off, (Well as near as it will!). Trimming the control surfaces should then be used to account for loading conditions.
Rigging a plane to fly straight when unevenly loaded by tweaking control surfaces to not be symmetrical or even with each other - means when controls are “relaxed” or “centered” you start to introduce unequal control inputs, potential adverse yaws and flying in a slight skid or slip.
Now it might seem that this is no different than centering and then trimming. But it’s not.
If you have rigged a plane to fly straight by having it skid or slip slightly - you have introduced an unknown element when flying on the edge of the flight envelope. The plane might stall, spin or behave unpredictably. You might not intend to fly on the edge of the envelope - but during a wake encounter and upset recovery - you want the plane as aerodynamically “in rig” as possible. No surprise effects.
While YOU might not have a problem with this slightly out of rig condition - the next owner of your aircraft might be in for a nasty surprise.
–
End of opinion.
Let’s look at the Cessna 100 series aircraft for a moment. Because with both older C150 and 172’s I’ve seen this Frankenstein rigging situation occurs quite frequently - to the point the planes get dangerous. This one is a TRUE story:
The first clue was a trim tab applied to an aileron to correct a “wing heavy” condition. This is a major alarm bell - it should not be needed. The new owner - a low time freshly minted PPL who was time building reported the plane was dangerous in a power off stall. It rolled into an incipient spin virtually every time. It was not his low time. He got bac in the school plane and could stall straight and level no problem. Power on stalls almost guaranteed an over the top spin entry. When visually flying straight and level with light and apparently even control forces - the ball showed the plane was skidding. The plane’s logs showed a number of attempts to fix the issue over the years and when we got to the root of it - it was mistake building on mistake building on mistake - each attempting to “fix” the plane. The advice was to stop flying the plane till it could be rerigged by someone who actually knows how to rig a C100 series.
So:
The empennage was not twisted from riding out a big storm in the tie downs.
The Turn Coordinator was correctly fitted - ball centered - when the plane was level on the ground.
Principle adjustment points are main wing root incidence on adjustable cams to vary each wing’s AoA, bellcranks, tied rods and rigging tension for flaps, ailerons, elevators and rudder. Rudder tab (if fitted - it’s an option). You also have to pay attention to “rudder springs” under the floor which center the rudder rigging in flight and make sure as you touch down the nosewheel is tracking straight - this is also achieved with a “cam” action on the extended nose strut that locks the wheel straight and unlocks as weight is applied to the compressing strut. Because the rudder pedals steer the nosewheel and work the rudder - those springs can skew the rudder. If one gets out of tension with the other - sitting on the ground - all can seem well - but in the air you get a different story.
Long and the short the experienced rigger removed the aileron tab and “let off” all the rigging. Then following Cessna’s carefully choreographed sequence - “built up” the rigging situation from first principles till the plane measured “straight” and “in rig”. Just about every single parameter of the rigging “as found” was completely different when rigged “as should be”. Plane flew much better, stalled more or less gracefully - though was still dropping a wing more than was normal, and was still skidding a touch.
Back to the rudder springs - fit new just to be sure everything was equal - still didn’t solve the problem.
A double check on the steering tie rods to check they were equally adjusted and… They were not. But in a perverse way. The rods are actually supposed to be different lengths. They are different part numbers. These steering rods were the same length. One was the wrong part. When adjusted on the ground to steer straight - the wrong rod was applying some rudder in the air. Fit correct part and the whole plane was back in rig and flying correctly.
–
Near as can be determined - WAY back in the logs - the plane was not steering straight on the ground. The mechanic at the time fitted another steering rod (assumed NOW to be the wrong one) and got the plane steering straight but she was now out of rig in the air - and every subsequent attempt to re-rig the plane only involved one parameter and just built worse on worse till someone fitted an aileron trim tab and the plane was downright dangerous ongoing.
Ground up re-rig from first principles putting everything where it should be - and the plane was docile and sweet to fly.
–
YMMV
Re: Rudder Trim
Posted: Thu Jan 19, 2023 5:33 pm
by Skippydiesel
All very well articulated Graeme BUT unlike a factory build where jigs and sophisticated fabrication systems are the norm, ensuring a uniform end result, building from a kit or plans can & does result in unintended variations, that may not prevent the aircraft from flying but even when carefully rigged, according to Sonex instructions, results in different handling characteristics.
I am still working through my aircrafts anomalies - non major but negatively impact on my enjoyment of the aircraft.
Re: Rudder Trim
Posted: Thu Jan 19, 2023 7:41 pm
by GraemeSmith
Skippydiesel wrote:a factory build where jigs and sophisticated fabrication systems are the norm, ensuring a uniform end result,
Your comment made me smile. I know some old timers from back in the day at Cessna. They will tell you - there were SOME jigs - but when they were cranking 150/2’s and 172’s - the planes were essentially hand built. You can’t take a skin from (say a 1965 built) 150 and fit it to another. If nothing else - none of the rivet holes will REMOTELY line up. And the skins will often not fit for curvature. Hence when repairing - you have to start with a new skin and make it fit. Or have a whole component assembly from the junk yard with a chance the attachment points will line up.
They only did an actual Weight and Balance for every tenth plane off the line - as long as it was close enough to the one from ten previously - the ones in between got copy W&B - signed off as if the plane had actually been weighed.
Like car doors back in the day - the tolerances were good for their time and the budget but involved lots of shims and big gaps. Unlike modern cars where the gaps are tiny and doors and jigged and welded on by robots.
I’ll hazard that a patient and thorough home builder will produce a more accurately/symmetrically built plane than those Cessna’s back in the day. It may not be the same as the next Sonex over by the next builder over - but I’ll hazard most modern home built will be built “truer”.
Some speculation to the above… But the bits about factory practices are true as told to me by those who were there.
Re: Rudder Trim
Posted: Thu Jan 19, 2023 10:11 pm
by Skippydiesel
I believe you but that was “back in the day” - what now?
Todays customer has much higher (quality) expectations from their car and I would guess (not being in the market) for a new aircraft/car. In large part this has been drive by Gov.legislation/oversight, more precise/repeatable production/fabrication techniques, etc.
Re: Rudder Trim
Posted: Thu Jan 19, 2023 10:12 pm
by Skippydiesel
I believe you but that was “back in the day” - what now?
Todays customer has much higher (quality) expectations from their car and I would guess (not being in the market) for a new aircraft/car. In large part this has been drive by Gov.legislation/oversight, more precise/repeatable production/fabrication techniques, innovations in materials, etc.
Re: Rudder Trim
Posted: Thu Jan 19, 2023 11:27 pm
by Bryan Cotton
GraemeSmith wrote:You can’t take a skin from (say a 1965 built) 150 and fit it to another. If nothing else - none of the rivet holes will REMOTELY line up. And the skins will often not fit for curvature. Hence when repairing - you have to start with a new skin and make it fit. Or have a whole component assembly from the junk yard with a chance the attachment points will line up.
I rebuilt a 1946 Cessna C140 and was amazed at how well parts from one would fit another. I think they had good tooling.
My hand-built (from CNC laser cut parts) Waiex ended up pretty straight and true.
Igor Sikorsky said “If you build an airplane straight, it will fly straight. If you build it crooked, it will fly crooked.”
Re: Rudder Trim
Posted: Fri Jan 20, 2023 7:46 am
by GraemeSmith
Bryan Cotton wrote:I rebuilt a 1946 Cessna C140 and was amazed at how well parts from one would fit another. I think they had good tooling.
Course you did! ![]() And I’m not being fresh. I suspect the immediate post war planes were much better built. Not that the period in the '60’s were not well built - but they were cranking them out. I can’t tell you the number of those where stuff just doesn’t fit well between planes.
And I’m not being fresh. I suspect the immediate post war planes were much better built. Not that the period in the '60’s were not well built - but they were cranking them out. I can’t tell you the number of those where stuff just doesn’t fit well between planes.
Bryan Cotton wrote:Igor Sikorsky said “If you build an airplane straight, it will fly straight. If you build it crooked, it will fly crooked.”
THAT THERE is a good summary of what I’ve been droning on about!! ![]()
Re: Rudder Trim
Posted: Fri Jan 20, 2023 10:30 am
by Bryan Cotton
Graeme, I believe you that the C150/2 series is not the same as the C140. As I said I was really surprised how well parts fit. I did remake a lot of parts from scratch Sometimes that is just a lot easier and ends up better in the end.
Re: Rudder Trim
Posted: Sat Jan 21, 2023 5:15 pm
by GraemeSmith
I photographed this today.
Legacy Sonex
200lb pilot left seat
20lb tools etc right side.
So about a 180lb moment in the center of the left seat.
My “aileron trim bungee” pulls the stick this amount to the right.
Which applies this amount of aileron in straight and level flight at 95KIAS
Sorry - didn’t get out while in flight with the protractor to measure the angle. Left the parachute in the car today…
Re: Rudder Trim
Posted: Sat Jan 21, 2023 10:46 pm
by Skippydiesel
Latest -
Reduced my rudder trim to 100 x 30mm and lowered my left flap 1/2 turn. Good result! aircraft now straight & level in cruise flight. May attempt to minimise size of rudder trim tab or just leave as is.
Next big push(after test flight schedule completed) is to come up with a better radiator/oil cooler locations, which will mean a change in cowling shape.
Re: Rudder Trim
Posted: Sun Jan 22, 2023 11:11 am
by Onex107
Skippydiesel wrote:Latest -
Reduced my rudder trim to 100 x 30mm and lowered my left flap 1/2 turn. Good result! aircraft now straight & level in cruise flight. May attempt to minimise size of rudder trim tab or just leave as is.
Next big push(after test flight schedule completed) is to come up with a better radiator/oil cooler locations, which will mean a change in cowling shape.
I found that by adding gap seals to the rudder and elevator it straightened my Onex out without trim tabs.
Onex107
Re: Rudder Trim
Posted: Sun Jan 22, 2023 2:32 pm
by pfhoeycfi
John Monnett wrote:Over the years and a bunch of aircraft I have used a simple method to determine the size of trim tabs. A length of a common soda straw is taped to the trailing edge of the surface on the side you want to deflect. Make an educated guess as to the length,(say 8 to 6") and test fly. trim the length to adjust. Once you’ve got it right, then make an aluminum tab to match.
I tried that this morning and it worked well. I will make a small tab based on the straw dimensions.
Re: Rudder Trim
Posted: Sun Jan 22, 2023 8:25 pm
by Skippydiesel
Onex107 wrote:
Skippydiesel wrote:Latest -
Reduced my rudder trim to 100 x 30mm and lowered my left flap 1/2 turn. Good result! aircraft now straight & level in cruise flight. May attempt to minimise size of rudder trim tab or just leave as is.
Next big push(after test flight schedule completed) is to come up with a better radiator/oil cooler locations, which will mean a change in cowling shape.
I found that by adding gap seals to the rudder and elevator it straightened my Onex out without trim tabs.
Onex107