Cotton AeroVee 0795

Cotton AeroVee 0795

Posted: Tue Sep 27, 2016 10:09 pm

by Bryan Cotton

Off to a slow start. Still, it’s a start. I spent some time going through the parts with Adam. Been a long time since we built the plastic visible L4 engine. We started off doing a little QA. We inspected the case per the SB for the breakout- seems good. Next I remember the issues Ryan had with his head. Turned off the lights in the hangar and put a flashlight up each port. Most were good, but I could see light on one side of one intake valve. May be crap stuck in the seat. I could use a recommendation for a valve compressor tool for the VW- anybody?

Next we went to bolt the cam gear to the cam. My cam kit had 3 bolts and two wavy washers. Where is the best place to get one? Any VW afficionados have a spare they could mail me?

Well, onto the rods. Opened up my lithium grease to find it is black, not white as called for. Darn! Any reason I can’t use the moly engine assembly lube I bought? Reading the label it seems like this is what it is for.


Re: Cotton AeroVee 0795

Posted: Wed Sep 28, 2016 12:05 am

by wlarson861

The best spring compressor “type” is similar too this one: https://www.amazon.com/Unknown-50602-Valve-Spring-Compressor/dp/B002GQEZH0/ref=sr_1_3?ie=UTF8&qid=1475034656&sr=8-3&keywords=valve+spring+compressor
there are heavier models and I can’t vouch for this particular one. This works with the heads removed only. I tried the type with the 2 jaws that will work with the head still in place on the engine and had clearance issues of getting the jaws on the spring without hitting the edges of the casting. this type is similar to this one: https://www.amazon.com/OTC-4573-Universal-Overhead-Compressor/dp/B000F5HUUI/ref=sr_1_2?ie=UTF8&qid=1475034656&sr=8-2&keywords=valve+spring+compressor

A better test for leaks is to put the plugs in and fill the chambers with gas or solvent and see how long they hold solvent. My last heads, 2 cylinders leaked out in under 15 min. The replacement heads, one leaked enough in 2 hours to see the solvent level had dropped. The other 3 held solvent at the same level overnight. A local IA said that was good enough.
I used white lithium grease to assemble mine but I’m certain I have read on the forum that several people have used the moly lube, don’t know if there are advantages to either.


Re: Cotton AeroVee 0795

Posted: Wed Sep 28, 2016 7:13 am

by daleandee


Re: Cotton AeroVee 0795

Posted: Wed Sep 28, 2016 9:51 am

by vwglenn

Bryan Cotton wrote:I could use a recommendation for a valve compressor tool for the VW- anybody?

Next we went to bolt the cam gear to the cam. My cam kit had 3 bolts and two wavy washers. Where is the best place to get one? Any VW afficionados have a spare they could mail me?

Well, onto the rods. Opened up my lithium grease to find it is black, not white as called for. Darn! Any reason I can’t use the moly engine assembly lube I bought? Reading the label it seems like this is what it is for.

You should be able to get the wavy washer just about anywhere It’s just a thin M8(Lowes, Home Depot, Local auto parts, in the Metric section). I’m sure I have a bunch of wavy washers floating around in my garage somewhere.Don’t forget to use some thread locker on those cam bolts. Ask me how I know. :roll:

I have an old valve compression tool for VW heads. Think I’ve used it once. It’s steel and pretty big but I’d be happy to ship it if you’d like. Looks like this but it’s probably 50 years old…

I don’t see why you couldn’t use the assembly lube of your choice but I’ve never actually read the Aerovee assembly manual. Think the last engine I put together I used a friends stuff and it was purple. Turned the engine oil pinkish when we broke the engine in and drained the oil the first time.


Re: Cotton AeroVee 0795

Posted: Thu Sep 29, 2016 10:19 pm

by Bryan Cotton

Glenn,
I struck out on wavy washers at Home Depot. I’ll try Lowes.

Adam has used the torque wrench before but this task was an exercise in careful assembly and cleanliness. It came out good. Funny how the rods spin poorly until you start to torque them down.

All our side clearances were good. We measured one up at .014 just for the exercise then verified the rest were > .005 and < .020.


Re: Cotton AeroVee 0795

Posted: Fri Sep 30, 2016 9:35 am

by vwglenn

I’ll go dig through my pile of VW crap and see if I can’t find a washer for you. PM me your address and I’ll shove some in a envelope on the off chance you can’t find one. Let me know if you wan the vavle spring compressor. I can mail it to ya and you can hold it till I see you again or mail it on to the next guy who needs it. I don’t do my own head work. There’s a local shop I have do all that kind of work.


Re: Cotton AeroVee 0795

Posted: Fri Sep 30, 2016 10:22 am

by Bryan Cotton

Glenn,
Found some wavy washers at Menards this AM. They are zinc plated. Looks similar to the ones in the kit- so I guess I’ll use them. I have a valve spring compressor on its way. Thanks for the offer!


Re: Cotton AeroVee 0795

Posted: Sat Oct 01, 2016 8:50 am

by Bryan Cotton

I’ve been cleaning up the case. Here is a case saver before I cleaned up the chips from milling for clearance:

I noticed the case savers can still spin. I had to spin some as it seems the machining operation spun them enough at the end that they were sticking up inside. Is it common to not locktite them in? No reference to it in the manual so I plan to continue.

Hard to see but I put mineral spirits in the head that passed the flashlight test:

It made it through a couple hours yesterday and I’ll check it later today. Regarding the other head, Kerry instructed me to send it back. Good service there and thanks to the guys who shared their problems so I knew to check early.
I think I am going to put in tim-serts proactively.


Re: Cotton AeroVee 0795

Posted: Tue Oct 04, 2016 9:15 pm

by Bryan Cotton

Here I am teaching Adam to be as studly as I am:

How in the heck did you guys get the front pressure relief valve in? The spring is a mile long and I can’t get the theads to engage. Managed to not shoot the plug to Saturn at least.

I also figured a way to get the plug out. Get a soft piece of wood that is a tight, slightly oversize fit and tap it in. This is a good way to check for freedom of movement before you commit. I ended up havin to polish mine down slightly.


Re: Cotton AeroVee 0795

Posted: Wed Oct 05, 2016 6:23 am

by Area 51%

Why aren’t there any threads in the other spark-plug hole? That is a second plug hole, isn’t it?

For whatever it’s worth…When it comes time to prime your oil pump, here is what I have done in the past on the VW aircooled auto engines. I took an old oil pump cover and drilled a hole on the centerline of the drive gear a little larger than the shaft. It’s easy to find the centerline as the pump gear leaves wittness marks on the cover. Then I turned the drive gear around so the shaft sticks out of the hole. (If you use the gear/shaft that will be used in the running engine, do not grab it with a drill motor to turn it for fear of scarring the shaft.) So, either attach a drill to the protruding shaft (sacrificial), or to a coupler of some sort to s

pin the shaft. A very thin O-ring between the gear and cover will keep the oil from coming out wholesale, but it still tends to be a messy process. Just the same, all the galleys and lifters will have oil available from the first crank of the engine.

Also, the VW manuals that I have, (written on stone tablets) recommend Vaseline as a priming agent, not grease.

Issueing grains of salt here @ Area 51%

Re: Cotton AeroVee 0795

Posted: Wed Oct 05, 2016 9:07 am

by sonex569

For what It is worth, I used a hand pressure sprayer. Modified the hose to attach to pressure sender port. Kept pumping oil in until the oil was weeping out the push-rods. Felt it was well oiled before first start.

Regards
Dick
Sonex569

http://growgreenmi.com/1-gal-flo-master … oCdQvw_wcB


Re: Cotton AeroVee 0795

Posted: Thu Oct 06, 2016 10:55 pm

by Bryan Cotton

Dick,
Good idea - thanks for sharing.

Got the crank dropped in:

After a couple tries we got the dowel pins lined up and the case joined. No interference.

The pressure relief valves cooperated tonight. Not sure why. We are missing two main bearing stud seals. I’ve sent an inquiry to Sonex.


Cotton AeroVee 0795

Posted: Fri Oct 07, 2016 5:32 pm

by Sonex1517

[quote=“Bryan Cotton”]

The pressure relief valves cooperated tonight. Not sure why. ]

Must have been the cursing…

Sent from my iPad using Tapatalk


Re: Cotton AeroVee 0795

Posted: Fri Oct 07, 2016 7:12 pm

by Bryan Cotton

Robbie,
Your suggestion was the only helpful one I got on this topic. I think the valve overheard me telling the cursing plan to Adam and it shaped up. I did spend some time sanding and polishing the plunger to fit better, perhaps it was not down all the way on the first attempts.


Re: Cotton AeroVee 0795

Posted: Tue Oct 11, 2016 10:10 pm

by Bryan Cotton

Adam and I were working away on the Aerovee when he spotted rule #7:

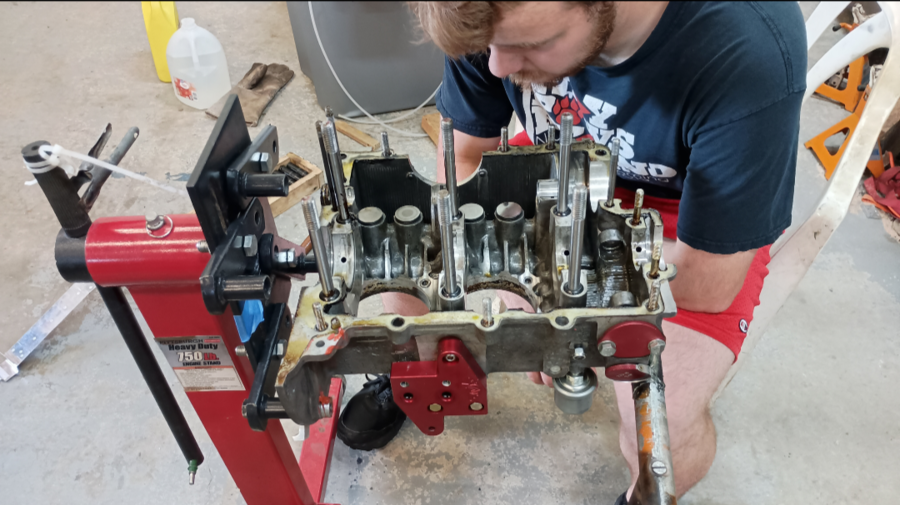
In haste, we pulled the engine off the stand.

You can see my two new valve spring compressors. The C clamp one does not work on the VW head because of interference with the valve cover boss. The other one works but is a hazard. Thanks to Robbie’s helpful advice we got it to work. We pulled the valve, seat was clean, but we still had a light leak. I’m off to see if I have a 36mm socket in my collection.

I see we are neck and neck with Darick. To ensure we beat him into the air we plan to fly this year. I figure about December 142nd or so.


Re: Cotton AeroVee 0795

Posted: Wed Oct 12, 2016 8:47 am

by Darick

Bryan, you had me confused and concerned for a while but then I realized it was just a ploy to give yourself a possible lead. I won’t waste anymore time trying to figure out what December 142nd is.

I, on the other hand, will give you a tip to keep you speedily progressing.

I noticed you have not painted your engine which can be problematic as they can be very temperamental, as you have already experienced with the uncooperative valve. An engine likes a nice good looking paint job. Yours is angry with you and will keep giving you problems unless it is painted. I suggest you take it apart and start over with a nice paint job.

I’ve changed my lift off date to early next year…or maybe sooner. :roll:


Re: Cotton AeroVee 0795

Posted: Wed Oct 12, 2016 9:35 am

by vwglenn

The only time my VW gets mad is when I ignore it too long. It’s currently pissed at me.


Re: Cotton AeroVee 0795

Posted: Thu Oct 13, 2016 10:09 pm

by Bryan Cotton

I splurged on the machined angle components and the prebuilt wingspar, so I figured why spend a bunch of dough on a fancy prop. I am a reformed scratch builder after all.

Here Adam is checking our end gap with feeler gauges before we selected shims.

We measured the shims with the Chinese digital readout calipers and then I busted out the old Brown & Sharp caliper to teach him how to use the good stuff. We are dreadfully close to closing up the case. Our final end gap was .005".


Re: Cotton AeroVee 0795

Posted: Thu Oct 20, 2016 11:33 pm

by Bryan Cotton

Adam discovering the joys of permatex #3:

All torqued and ready for pistons:

We have not had a lot of time lately, but it is going together fast!


Re: Cotton AeroVee 0795

Posted: Sat Oct 29, 2016 1:55 pm

by Bryan Cotton

I put a little grease on each of the plug threads, screwed them in, and torqued to 12 ft-lbs. All seemed good so I think I will skip the time-serts for now. Here Adam is checking the ring gap:

They were all good so onto the deck height. Ours was +0.00725" or piston down .01" from the top of the cylinder.

Re: Cotton AeroVee 0795

Posted: Sat Nov 05, 2016 9:40 am

by Bryan Cotton

I am glad the World Series is over. I am not a sports fan but Adam has become one. Now I have my co-builder back. Here is Adam experiencing the ring compressor for the first time.

He got pretty good at getting the piston into the jug. The third cyclinder was killing us though. Every time we tried to push it back out to expose the wristpin we went too far and the oil ring popped out. Adam had 6 tries and I took one. Then we decided this was a sign it was quitting time.


Re: Cotton AeroVee 0795

Posted: Sat Nov 05, 2016 1:46 pm

by Bryan Cotton

Here is the solution for putting the piston in the right amount. We put about 4.2" of shims in the cylinder. In the picture the cylinder needs to be flipped over before we put the piston in.


Re: Cotton AeroVee 0795

Posted: Sun Nov 06, 2016 3:05 pm

by Bryan Cotton

Remember I said we flipped the cylinder over before putting the piston in? I guess not!

First cylinder going on:

Permatex time. The bigger the blob, the better the job- right? Only kidding, I’ve taught him to use it sparingly.

Going:

And, one side done. Then he was out for a lesson in the J3.
Image


Re: Cotton AeroVee 0795

Posted: Fri Nov 11, 2016 12:13 am

by Bryan Cotton

Head in place. Thanks to all who discussed pushrod tubes via the other thread and email. Mine were good.
Image

Adam torquing down head bolts:
Image

Two heads on and torqued.

After we got back Adam went and found his Visible L4 model he built at age 11 or 12. He wants to get it working. It used to sort of work, but his skills were less back then and I didn’t want to take over. Smart move.


Re: Cotton AeroVee 0795

Posted: Sat Nov 12, 2016 1:00 pm

by ScottM-Sonex1629

You guys almost look ready to install on the airframe and have the first start!


Re: Cotton AeroVee 0795

Posted: Sat Nov 12, 2016 2:16 pm

by Bryan Cotton

Should I run it after it is built or wait until close to taxi & flight?


Re: Cotton AeroVee 0795

Posted: Sun Nov 13, 2016 10:58 pm

by Bryan Cotton

Got the studs trimmed:

This job sucks. Would be totally worth it to dry assemble the engine after the deck height check and trim the pushrods out of the engine.

I discovered the Aerovee uses the same plugs as my Saturn.


Re: Cotton AeroVee 0795

Posted: Mon Nov 14, 2016 11:14 am

by ScottM-Sonex1629

Bryan Cotton wrote:Should I run it after it is built or wait until close to taxi & flight?

Bryan - keep your engine pickled until your ready to do extensive ground runs and taxing, etc. I only pre-oiled mine and then the engine sat for over a year before first start. I’m just trying to encourage you and your son to keep up the good work and get closer to finishing!


Re: Cotton AeroVee 0795

Posted: Thu Nov 17, 2016 10:56 pm

by Bryan Cotton

To trim the pushrods, I first did one by hand and considered it my “reference” pushrod. Next, I got a piece of 2X4 and drilled a couple 3/8" holes in it. The pushrods were a snug fit in the holes. On the left you can see I made a reference gauge out of scrap, so the new pushrod will always stick out of the 2X4 the same amount. This dimension can be anything, it just needs to be repeatable. Then I stuck my reference pushrod in, and squared up the ends with the ball.

Now over to the drill press. I adjusted the height of the table until the cutoff wheel just scraped on the reference pushrod.

And time to cut. The dremel wheel was not holding up so I had to find the big boy wheel.

I don’t have a lathe.

And then a major setback- one of the lifters slipped out when we joined the case. We have to split it.

Crap.


Re: Cotton AeroVee 0795

Posted: Fri Nov 18, 2016 12:06 am

by gammaxy

I used a pipe cutter to cut the pushrods.

Sorry about the lifter slipping out. I’m surprised you didn’t hear it moving around when you were flipping the engine back and forth. The assembly video shows how to hold the lifters in position using clothespins while assembling the case.

Cotton AeroVee 0795

https://sonexbuilders.net/viewtopic.php?f=7&t=3232

Page 4 of 15

Re: Cotton AeroVee 0795

Posted: Fri Nov 18, 2016 12:15 am

by Bryan Cotton

Chris,
We did hear it, but convinced ourselves the lifters were slipping back and forth in their bores. We’ll watch the video. The motor comes apart fast! Got the top end off.


Re: Cotton AeroVee 0795

Posted: Fri Nov 18, 2016 10:00 pm

by Bryan Cotton

Case split, cleaned, and fresh permatex going on:
Image

Clothespins in backward to hold the lifters, with a piece of welding rod holding the clothespins:
Image

Torquing case haves again:

We are nearly back on track.


Re: Cotton AeroVee 0795

Posted: Sat Nov 19, 2016 8:43 pm

by Bryan Cotton

Whoops:

Adam was having an off day - first he spilled my cup of coffee and then he forgot the super tin. On the bright side, we have potential to be a Formula Vee pit crew!


Re: Cotton AeroVee 0795

Posted: Sat Nov 19, 2016 10:19 pm

by Brett

Oh no, not the coffee :slight_smile:

Looking good but.


Re: Cotton AeroVee 0795

Posted: Tue Nov 22, 2016 10:10 am

by Area 51%

I think I see the problem…You don’t have your Waiex shirt on.


Re: Cotton AeroVee 0795

Posted: Tue Nov 22, 2016 10:34 am

by Bryan Cotton

Ha - just ordered up two fresh Waiex shirts, Randy. They are on sale, $9.99 at www.eaa.org. Adam has adopted my old EAA533 shirt for the dirty jobs. The reason it is partly bleached out is because I was doing a plumbing job, and had to remove some pipe. My wife had thoughtfully put about 10 gallons of liquid plumber down the sink before calling me about the job. When the pipe cracked, it all dumped on me and I had to beat it to the shower to get that stuff off of me. It was actually sort of scary.


Re: Cotton AeroVee 0795

Posted: Tue Nov 22, 2016 10:58 am

by Area 51%

Saw the bleach spots on the shirt in the picture…Thought you got hold of my laundry some how.

Got the engine mount on and gear legs attached. Nice to be able to roll the beast out of the way. Still fighting with the fuel tank though.


Re: Cotton AeroVee 0795

Posted: Tue Nov 22, 2016 11:06 pm

by Bryan Cotton

We had to grind the case with the dremel a bit to fit the oil pan thing on:

Ultimately we triumphed. Good dremel practice for Adam.

We got one drive bushing 98% on and then snapped my one bolt. I’ll have to buy some grade 8 bolts for this task. Also I had to tweak the oil pickup into place for the screen to go on.

With the top mounted oil cooler do I want a different pump? Seems like running a loop of tube is a pain. We have the maxi-flow pump.


Re: Cotton AeroVee 0795

Posted: Wed Nov 23, 2016 1:06 am

by wlarson861

Knowing I would eventually upgrade to the turbo, I changed to the top mounted oil cooler. My pump that came with the original engine kit had the ports for the bottom mount oil cooler. When I asked Kerry he said to run a loop of braided hose, otherwise I would end up with three different oil pumps. I made up a bypass loop of hose and ran several flight hours that way until I decided to go turbo. The only thing to watch out for is that you make it long enough to push out of the way of the cowl. I also wrapped the braid with silicone tape to keep the braided stainless steel from wearing the fiberglass of the cowl. The price for a new straight pump is $81.50, the hose less than $10.


Re: Cotton AeroVee 0795

Posted: Wed Nov 23, 2016 10:58 am

by Bryan Cotton

Do those ports plumb to the turbo if I go that route later?

Re: Cotton AeroVee 0795

Posted: Wed Nov 23, 2016 11:02 am

by vwglenn

So no studs on the oil plate? Interesting.

I probably would’ve clearanced the oil plate and left the case alone. Grinding on magnesium is doable but generally frowned upon.

Does the Aerovee top mount oil cooler not simply mount to the stock holes? I always thought it was similar to a Type 3 setup. If so, why would you want a different pump? Turbo thing?


Re: Cotton AeroVee 0795

Posted: Wed Nov 23, 2016 2:42 pm

by wlarson861

Do those ports plumb to the turbo if I go that route later?

No. The turbo uses a two stage pump. The front hose fittings are similar but serve a different purpose. The intake to the front half of the pump pulls oil from the turbo to the pump then sends it into a fitting in the right rocker cover to return oil to the sump.


Re: Cotton AeroVee 0795

Posted: Thu Nov 24, 2016 5:33 pm

by Bryan Cotton

I have a two stage pump in my collection - was for my half VW. So I searched for external mount oil filters on the forum. The older stuff came back as either frowned upon or flat out not recommended. But then I see the turbo SB specifies an external oil filter. If I am going to upgrade to a turbo someday, once you early adopters have it worked out, it would seem handy to put that filter on now using my current oil pump. I might do that.


Re: Cotton AeroVee 0795

Posted: Thu Nov 24, 2016 6:19 pm

by Brett

I thought that exact same thing when fitting my external filter the other day. :slight_smile:

I wonder though can the oil changes be delayed a little now. I always thought every 25 hours was due to the fact the Aerovee ran no filter but the turbo engine basically runs two filters now. Still I guess running the turbo the 25 hour interval is more important than ever.


Re: Cotton AeroVee 0795

Posted: Thu Nov 24, 2016 6:58 pm

by rizzz

Brett wrote:I thought that exact same thing when fitting my external filter the other day. :slight_smile:

I wonder though can the oil changes be delayed a little now. I always thought every 25 hours was due to the fact the Aerovee ran no filter but the turbo engine basically runs two filters now. Still I guess running the turbo the 25 hour interval is more important than ever.

The Great Plains manual states 25 hours with no filter, 50 with filter.
GP does not do turbos though…


Re: Cotton AeroVee 0795

Posted: Thu Nov 24, 2016 7:29 pm

by Bryan Cotton

Glenn,
I hadn’t responded to your post yet. Not sure what you mean by studs on the oil plate - there are 6 studs sticking out of the case. The plate was thin, the bosses were thick so it seemed safe to grind a little. We used a sanding drum from the dremel. The case had been machined for clearance, but not enough. Regarding the top mount oil cooler, I thought that bugs had an adapter that made the cooler stick straight up. The Sonex part bolts to the case but is machined to lay the cooler down. I didn’t check to see if the cooler would just bolt to the engine.

I’ve never made aircraft hoses before. Can anybody point me to a good reference? What parts do I need?


Re: Cotton AeroVee 0795

Posted: Mon Nov 28, 2016 11:37 am

by vwglenn

Bryan Cotton wrote:Regarding the top mount oil cooler, I thought that bugs had an adapter that made the cooler stick straight up. The Sonex part bolts to the case but is machined to lay the cooler down. I didn’t check to see if the cooler would just bolt to the engine.

I’ve never made aircraft hoses before. Can anybody point me to a good reference? What parts do I need?

Beetles and early buses have the upright oil cooler. The “Type 3” (Squareback, Notchback, Fastback) have the same basic engine with an entirely different cooling/tin/fan system so they can fit in the different body style. The Type 3 oil cooler lays flat and hangs over #3&4 cylinders. The Aerovee is similar except the cooler is over the case itself. The oil pump in either the Type 1 (Beetle) and Type 3 (Notch) are the same if memory serves. When I was reading this thread earlier I got curious about the oil pump references. It seemed like there was a need to change the pump or something because of the oil cooler???

Type 3 setup…

The only danger in grinding the case is the fire danger. If that magnesium gets hot enough it will turn night into day when it catches fire. And you CAN catch it on fire by grinding on it.

Making hoses is not terribly difficult. I’ve done it a few times. Built oil lines for my full flow filter system on the bus (braided stainless). Also did fuel lines for the Cessna 170 and the Sonex when I pulled the gascolator. Parts are readily available at Spruce or Summit Racing.


Re: Cotton AeroVee 0795

Posted: Mon Nov 28, 2016 11:58 am

by Bryan Cotton

Glenn,
The stock Aerovee kit is set up for a bottom mounted oil cooler. The pump cover has NPT holes, one for oil out to the cooler and a return. The kit also comes with a block off plate for the stock oil cooler location. The top oil cooler adapter does use the stock holes, but flips the cooler so it is over the case, and moves it back. This is for cowl clearance. Now I don’t need those NPT ports in the pump cover anymore. My options are a loop of hose, a new oil pump without the ports, or in my case I am leaning towards the turbo external filter.


Re: Cotton AeroVee 0795

Posted: Mon Nov 28, 2016 2:02 pm

by vwglenn

Ahhhh! Now I get it. A typical “full flow” system taps the pump cover and then returns the oil to the case rather than the pump itself. Most of the “bolt on” systems have drawbacks with exhaust clearance in the cars and some didn’t force the oil through the filter. Most of the stuff they were supposed to catch simply bypassed the filter.

I’d go with your plan to add the filter and adapt the oil cooler as long as you’re going to have to run the loop anyway. Do you have a pic of the oil cover with the NPTs? I’m curious as to which style it is.

Now I’m more curious about the turbo setup and how it’s plumbed.


Re: Cotton AeroVee 0795

Posted: Mon Nov 28, 2016 2:25 pm

by Bryan Cotton

Glenn,
The oil pump is here:
http://www.sonexaircraft.com/eshop/cart … ACV-P01-55

If you download the Aerovee turbo manual and look up the latest SB you will get the turbo picture.

Re: Cotton AeroVee 0795

Posted: Mon Nov 28, 2016 3:38 pm

by vwglenn

Hmmmm…I must admit, I don’t ever recall seeing a cover like that before. I do have a little concern about the whole setup though.

Here’s a blurb from the Gene Berg site as to why…

“The only proper way to achieve full flow oil filtering without pressure or flow loss is to plug the pump, use a full flow cover, drill and tap the main oil gallery to return the oil. All other methods such as pump covers or pumps that have inlet and outlets all together at the pump reduce the pressure and flow of oil from stock and can cause damage or a premature failure to the engine.”

Now this is an old quote and things may have changed but it’s the conventional wisdom I remember. I’m sure the guys @ Sonex have considered this and chose not to do it for whatever reason (clearance? flow tests?). I imagine oil flow is pretty important in the turbo application.


Re: Cotton AeroVee 0795

Posted: Mon Nov 28, 2016 3:56 pm

by Sonerai13

Glenn,

The turbo oil pump is a completely different unit than used on any of the non-turbo applications. They are not interchangeable. The “maxi” oil pump that Bryan has is used when installing a bottom-mounted oil cooler. This was typical on Sonex installations until a few years ago, when we switched over to the top-mount (which Bryan is doing on his engine). The oil pump used in the bottom-mount cooler installation is not used on any other version of the AeroVee.

The bottom-mount cooler installation was used on hundreds of AeroVee installations for many years, and has shown no issues with pressure or oil flow. The only drawback is the external hoses and the cooler location itself, which is in the way when doing oil/filter changes. The top-mount cooler eliminates all external oil lines (to the cooler) and is completely out of the way for all normal maintenance procedures.


Re: Cotton AeroVee 0795

Posted: Mon Nov 28, 2016 7:22 pm

by rizzz

Brian,
I have the classic full flow filtering setup Glenn mentions above on my engine,
This requires a pump and cover plate with only an oil outlet, the oil is returned to the engine through a hole that’s drilled and tapped in the case just above the pump. The oil galley that normally leads the oil from the pump to that location is plugged so the oil is forced out the outlet in the pump cover.
the last picture on my kitlog page shows this here:
http://mykitlog.com/users/display_log.p … 842&row=15
You can see the AN fitting above the oil pump slightly to the left where the return line will go to (not yet installed here).

The AeroVee pump & cover basically achieves the same thing but it is a much easier setup as it allows the oil to return to the pump cover, after going through the filter the oil will then just return into that galley (which is plugged in mine), as it normally would with no external filter installed.
This is the “easy way” to full flow your engine as it does not require you to drill & tap oil galleys in your case.
Indeed Gene Berg & Bob Hoover both list concerns about this setup but always keep this is in the context of using these engines for street racing applications etc.
As Joe mentions no AeroVee has ever shown any problems with pressure or flow. I think you’ll be fine using your pump & cover to connect an external oil filter if that’s what you want to do.


Re: Cotton AeroVee 0795

Posted: Tue Nov 29, 2016 11:21 am

by vwglenn

Cool beans Joe.

I think the top mount cooler is brilliant. My initial confusion had to do with loops and my misunderstanding about changing/adding pumps. That confusion sent me down the rabbit hole.

For the record. I’ve run a filter pump, a full flow system, and plain old stock in my VWs in the last two decades. None have ever blown up on me. My first VW had the filter pump on it and I flogged on that engine for years. I did not treat it gently at all and it made it to 100k and was still running when I took it apart.

All the “maxi” pumps I’ve seen have a totally different cover on them which are not nearly as deep as the cover on the Sonex pump. VW oil pump covers need to be more shallow to clear the tin and pulley which might contribute to restrictions. Most of the time that inlet and outlet are on the same side of the pump cover too. The concern about restrictions also has a lot to do with RPMs. You’re average VW will cruise at 3500-4000rpm as it rolls down the highway. I think most VW gearheads will agree that the stock system works just fine. In race applications the RPMs can be pushed to nearly double that of the cruise numbers so more oil is probably a good thing. An Aerovee should never see that kind of RPM so there should be little concern of oil restrictions from the full flow system they use.

Even so, given the displacement of the Aerovee, I’d go with the widely accepted full flow system with the tapped case if I were building one. Either that or eliminate the full flow system if possible to increase simplicity.

Once again, In Bryan’s case, I’d run a filter since I already have all the associated equipment in place.


Re: Cotton AeroVee 0795

Posted: Tue Nov 29, 2016 11:35 pm

by Bryan Cotton

So we dropped the drive gear - look by the blue mark:

That stuff is soft. I had to file off the edge to get the gears to run freely. So - is it junk or as long as there is oil pressure am I good?


Re: Cotton AeroVee 0795

Posted: Wed Nov 30, 2016 10:49 am

by vwglenn

A lot of VW guys put a effort into blueprinting oil pumps in an attempt to get them as close to perfect as possible. Is that ding a big deal? Probably not. Will it effect it’s ability to produce pressure? Probably not. Would I change it? Yep. Only because I would hate myself if I didn’t.


Re: Cotton AeroVee 0795

Posted: Wed Nov 30, 2016 11:11 am

by DCASonex

As Glenn stated, probably not a problem, but one check I would do if using this is to place the blue marked face down on a piece of fine sandpaper on flat surface and lightly move it around. Should see even contact over entire surface. Might find it is high next to the dented area and this check will indicate extent of damage. It must be brought back down to level, and if minor, the sandpaper on flat plate can do that.

David A.


Re: Cotton AeroVee 0795

Posted: Thu Dec 01, 2016 11:57 pm

by Bryan Cotton

I came up with a solution for the pushrods. I put another shim under the rockers and the alignment was still good. Now I have a boatload of adjustment as the motor runs in. Adam now knows how to find TDC and adjust valves:

As a kid I learned good judgement to avoid stripping holes. How? Well, I stripped a bunch of holes, of course. Adam did his first one on the fuel pump blockoff plate. All the threads came out nicely like a spring on the bolt. We have a helicoil lesson in our future. I assume they have metric helicoils.


Re: Cotton AeroVee 0795

Posted: Fri Dec 02, 2016 10:30 am

by vwglenn

LOL! yes they have metric helicoils. You need to step on the gas. I have 10 bucks riding on this thing!


Re: Cotton AeroVee 0795

Posted: Fri Dec 02, 2016 10:58 am

by DCASonex

Bryan, and Adam,

Good judgement comes from experience. — Experience comes from bad judgement.

David A

Re: Cotton AeroVee 0795

Posted: Fri Dec 02, 2016 12:52 pm

by Bryan Cotton

I agree with the last 2 posts. Those bolts are M8 X 1.25 right?


Re: Cotton AeroVee 0795

Posted: Fri Dec 02, 2016 6:53 pm

by bakfly

Bryan Cotton wrote:I came up with a solution for the pushrods. I put another shim under the rockers and the alignment was still good. Now I have a boatload of adjustment as the motor runs in. Adam now knows how to find TDC and adjust valves:
Image

As a kid I learned good judgement to avoid stripping holes. How? Well, I stripped a bunch of holes, of course. Adam did his first one on the fuel pump blockoff plate. All the threads came out nicely like a spring on the bolt. We have a helicoil lesson in our future. I assume they have metric helicoils.
.
Just be careful,having another shim under the rockets brings the rockets and valve clearance adjusting screws higher up and there is a possibility they hit the rocket cover preventing the valves from closing, especially when the rocket cover gaskit is compressed a bit. This happen to me and I lost compression on 3 cylinders.
Peter,
Sonex 19-8464, Aerovee 2.1
Flown 140hrs


Re: Cotton AeroVee 0795

Posted: Fri Dec 02, 2016 9:18 pm

by Bryan Cotton

Thanks Peter, I will look out for that.


Re: Cotton AeroVee 0795

Posted: Sat Dec 03, 2016 11:08 pm

by Bryan Cotton

Grinding down the flange of the oil cooler:
Image

Next we had to bolt it to the case. No stripped threads tonight.
Image

Motor on bench so we can put on the rear main seal, shims and flywheel.
Image


Re: Cotton AeroVee 0795

Posted: Tue Dec 06, 2016 11:14 pm

by Bryan Cotton

I didn’t read far enough ahead to buy a VW oil seal installation tool. So, we made one. First, a little holesaw to make room for the crank pins. Next, a medium one to make a notch. Finally a big one to set the OD of the tool:
Image

The middle holesaw is taped to the plywood while seated in the notch.

Now I just need Locktite 272 and a 300 ft-lb torque wrench.


Re: Cotton AeroVee 0795

Posted: Wed Dec 07, 2016 5:11 am

by rizzz

Bryan Cotton wrote:Now I just need Locktite 272 and a 300 ft-lb torque wrench.

Hi Brian,
I doubt many of us have actually used a 300ft-lb torque wrench for this job. They are very expensive.
If you put an extension on a normal wrench/spanner with the correct socket attached, you can calculate how far from the center of the socket you have to push down with your full body weight to achieve the required torque, here’s how I did mine:
http://mykitlog.com/users/display_log.p … 484&row=57

I believe that’s what most people do.


Re: Cotton AeroVee 0795

Posted: Wed Dec 07, 2016 8:05 am

by Bryan Cotton

Thanks Michael. I’ll weigh Adam since I don’t want to go near the scale.


Re: Cotton AeroVee 0795

Posted: Wed Dec 07, 2016 3:22 pm

by sonexsteve

I’ve just done this job a few weeks ago, getting hold of the Loctite 272 was a major hassle, eventually found a substitute Kerry approved of. As for the torquing up to 227 ft/lbs I found an air powered impact wrench, sold for doing up vehicle wheel nuts, in a local technical chain store, that on its ‘high’ setting was rated at 300 ft/lbs - so I just used that. Can’t say whether it leaks or not, I’ve yet to run the engine.


Re: Cotton AeroVee 0795

Posted: Tue Dec 13, 2016 11:01 pm

by Bryan Cotton

The fine art of RTV / caulk application:

Torqued!


Re: Cotton AeroVee 0795

Posted: Fri Dec 16, 2016 8:06 am

by Bryan Cotton

We got the magnatrons, accessory plate, and intake manifolds installed last night. Magnatrons are gapped and torqued.

Re: Cotton AeroVee 0795

Posted: Sat Dec 17, 2016 5:55 pm

by Bryan Cotton

We now have evey form of loctite and permatex known to man. I am starting to believe that Aeroconversions is just a front to push their product.

Accessory plate in place.

We are cruising. Headed back over with Matthew to work on the new hovercraft project.


Re: Cotton AeroVee 0795

Posted: Sat Dec 17, 2016 7:00 pm

by ScottM-Sonex1629

You’re so close to installing the engine! Do you have all of the items on the firewall yet? Battery box, coils, grounding tree, etc?

We installed my AeroVee the same way (accessory plate on the engine mount), then two of us lifted the AeroVee up to the X-plate and a third person threaded the bolts on. 5 min job!


Re: Cotton AeroVee 0795

Posted: Sat Dec 17, 2016 9:38 pm

by Bryan Cotton

Scott,
I have nothing on there yet. I need to figure out where to put everything in case I want a turbo someday. I’ve lined up a cherry picker so we can put it on by ourselves.


Re: Cotton AeroVee 0795

Posted: Mon Jan 02, 2017 1:07 am

by Bryan Cotton

Test of postimg.org:


Re: Cotton AeroVee 0795

Posted: Mon Jan 02, 2017 8:46 pm

by Bryan Cotton

We got our nutplates installed for the coils, VR, and battery. Back:

Front:

I discovered my hardware kit does not have the engine mount bolts. Bummer!


Re: Cotton AeroVee 0795

Posted: Wed Jan 04, 2017 12:06 am

by Bryan Cotton

Coils and VR bolted on:


Re: Cotton AeroVee 0795

Posted: Mon Feb 04, 2019 11:29 pm

by Bryan Cotton

All,
There are two threaded holes we are pointing to in the picture. I assume this is a bug thing for mounting the fan housing or something, and I don’t need to worry about them. Is this right?

Aerovee holes.jpg

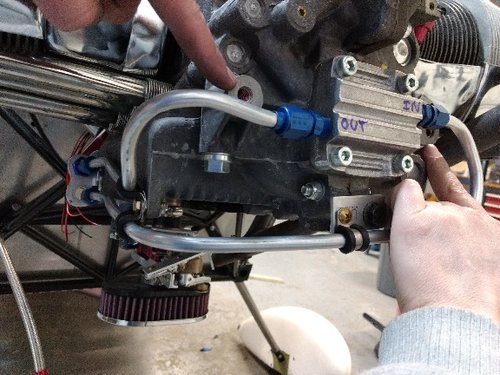
Also you can see the supports for the hard lines. Soft lines from the back of the engine to the filter.

There is a large opening to the sump in the front right corner. Would that be a suitable alternate location for the oil sender or will it not be in the oil for climbs and 3 point attitude?


Re: Cotton AeroVee 0795

Posted: Mon Feb 04, 2019 11:47 pm

by MichaelFarley56

Hey Bryan,

The two holes you’re pointing to are for automotive installation stuff and you won’t need to worry about them. I can’t quite see where you’re talking but there is an opening on the left (pilot side) side of the oil pump that’s open to the sump. This is a pretty standard location for your oil temp probe; the AeroVee manual gives you directions on how to drill and tap into the red block off plate for that spot so you can add the oil temp sensor. That’s where I have mine and it works great.

Is that what you meant? Looking great!


Re: Cotton AeroVee 0795

Posted: Tue Feb 05, 2019 7:28 am

by Bryan Cotton

Thanks Mike!


Re: Cotton AeroVee 0795

Posted: Tue Feb 05, 2019 8:53 pm

by peter anson

We now have every form of loctite and permatex known to man.

I’m afraid that’s not possible Bryan. While in fact there are only four types of Loctite; blue, red, green* and yellow; they put them in so many different numbered bottles that it is physically impossible to buy them all because no single retail outlet can be bothered stocking the complete range. Not only that, but they only have a one year shelf life so that when you are using them on something that really matters, like an aircraft, you are forced to buy the same ones over and over.

  • Green Loctite is just blue and yellow Loctite mixed together.

Peter

Re: Cotton AeroVee 0795

Posted: Tue Feb 05, 2019 9:08 pm

by Bryan Cotton

Peter,
Since I posted that two+ years ago, we rebuilt my '99 Saturn for Adam to drive to the local community college. We have since discovered more locktite. To put the gearbox back together we had to use the purple stuff and it was expensive. Which colors of the cheap stuff do you mix for purple? Blue and red?


Re: Cotton AeroVee 0795

Posted: Wed Feb 06, 2019 1:03 am

by peter anson

Gee, I didn’t even know about the purple Loctite. Obviously red plus blue.
There is a small job on Jabiru engines that requires about 6 drops of hi temp Loctite, 620 I think (green). It only comes in large bottles and costs about $56 a pop. I have bought a couple of those and it breaks my Scottish ancestral heart to throw them out. A bit of a fib there; I use it for almost anything I think is not too important until I can’t squeeze it out of the bottle, it really does have a limited shelf life.

Peter


Re: Cotton AeroVee 0795

Posted: Fri Aug 13, 2021 10:25 am

by Bryan Cotton

I think I’ve got the magnetron p lead issue. Check out the video at about 3:00.

I’ve got a note into Sonex tech support.


Re: Cotton AeroVee 0795

Posted: Fri Aug 13, 2021 1:54 pm

by Rynoth

Referencing my post from several years ago about my bad mags:

viewtopic.php?f=7&t=2468

I did end up receiving replacement mags, which worked correctly. My problem was indeed bad mags.

Here are examples of tests I performed on the bad mags:

“I have run numerous tests on both of my magnetrons and cannot keep them from firing. I have grounded them to the engine block using wires from the mount bolts, with an additional wire to battery ground. I’ve tested the continuity of my DPST magneto switch and it conforms to the specs in all regards. As an additional test, I ran a temporary wire from the p-leads to engine ground and the engine still runs on primary ignition only.”

Basically, make sure that the body of the mag has continuity to your p-lead grounding point. It’s possible, though very unlikely, that your accessory plate (to which the mags are presumably screwed into and have continuity with) is not grounded. Eliminate any possibility of an open circuit between the p-lead and the body of the mag, and if the mags are still firing they are bad.


Re: Cotton AeroVee 0795

Posted: Fri Aug 13, 2021 3:53 pm

by Bryan Cotton

Thanks Ryan! I remember that thread. In re-reading it, I will try directly grounding the magnetron P leads to see if they still work. Seems like a clever troubleshooting step that will be easy to implement.

I also remember this thread:
http://sonexbuilders.net/viewtopic.php? … 33&p=44800

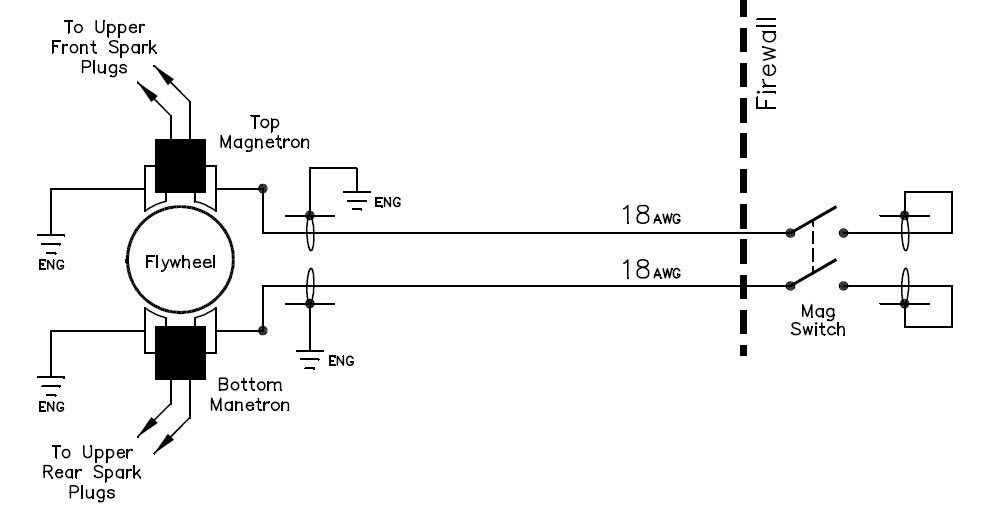
I did use shielded wires, as in this schematic:

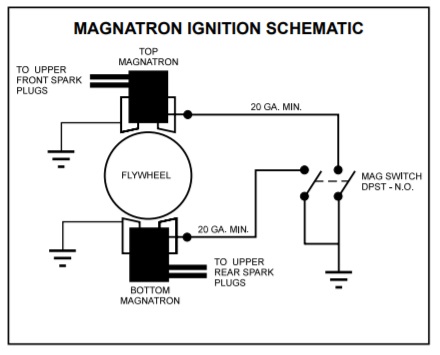
Electrically I see it as the same as what is in the AeroVee manual:

Kerry was not keen on the shielded wire. Maybe that is not a fair statement, he wanted me to wire it exactly as shown in the AeroVee manual before we declared the shielded wire innocent. That is reasonable. But before I run new wires through the firewall I’m going to just short them out directly and eliminate the switch.

Also I did ground the magnetron bodies. I put a lug under one of the mounting screws on each magnetron and ran that wire to my ground block at the starter. Before I did that, it ran poorly on the magnetrons only. After that I was able to get 3000+ RPM static on just the magnetrons.

I received my AeroVee either September or October of 2014, same date as the other problem children.


Re: Cotton AeroVee 0795

Posted: Sat Aug 14, 2021 11:08 am

by Rynoth

Bryan Cotton wrote:I received my AeroVee either September or October of 2014, same date as the other problem children.

Yup, mine was Nov 2014. Seems like a smoking gun.


Re: Cotton AeroVee 0795

Posted: Sat Aug 14, 2021 11:13 am

by Rynoth

Bryan Cotton wrote:Also I did ground the magnetron bodies. I put a lug under one of the mounting screws on each magnetron and ran that wire to my ground block at the starter. Before I did that, it ran poorly on the magnetrons only. After that I was able to get 3000+ RPM static on just the magnetrons.

Bryan, I’m sure you’ve done this already but figured it’s worth mentioning… do you have a dedicated heavy-gauge ground wire from your starter to ground block? Otherwise your starter could be finding its ground path through those magnetron lug wires.


Re: Cotton AeroVee 0795

Posted: Sat Aug 14, 2021 11:34 am

by Bryan Cotton

Rynoth wrote:Bryan, I’m sure you’ve done this already but figured it’s worth mentioning… do you have a dedicated heavy-gauge ground wire from your starter to ground block? Otherwise your starter could be finding its ground path through those magnetron lug wires.

My ground block is mounted on the starter.

Edit: in another thread people were asking where to ground the engine case. Here is my ground, on the distributor hold down stud. This wire goes back to the ground block in the other picture.

It’s not shown in the first picture, but later I had added ground wires from the magnetron bodies to that ground block under the starter mount bolt.


Re: Cotton AeroVee 0795

Posted: Sat Aug 14, 2021 1:46 pm

by Rynoth

Ground setup looks great Bryan. If you run temporary p-lead wires to your grounding point and the mags are still firing, I can’t imagine any other proof needed.


Re: Cotton AeroVee 0795

Posted: Sat Aug 14, 2021 6:09 pm

by Bryan Cotton

Here is the harness I made. I cut the plastic off the female spade connectors so I could make sure they were installed properly. I twisted both pairs of 16ga wire into a 3/16" lug.

Here is the harness installed on the top. I added the nut I’m pointing to for the lug. The two wires are running across my other finger.

Here it is on the bottom magnetron.

Here is the video.

Still ran poorly. I swapped back and forth between front and rear EGTs. Neither one got as cold as I’d expect for a shut off mag. Runs horrible when the p lead is shorted, however.

After I shut down I had a thought, and did another run. Instead of shutting off the secondary with the switch, I pulled the main breaker. As expected, it behaved the same as shutting off the switch.

Re: Cotton AeroVee 0795

Posted: Sun Aug 15, 2021 3:28 pm

by Rynoth

Well, it shouldn’t run at all. Mags could be bad in more than one fashion, they definitely owe you new ones.


Re: Cotton AeroVee 0795

Posted: Sun Aug 15, 2021 3:56 pm

by Area 51%

My money is on one good and one bad magnatron.

Remove your temporary short-circuit wires one at a time with a test run in between. If you remove a wire and the engine smooths out, you’ve found the good magnatron.


Re: Cotton AeroVee 0795

Posted: Sun Aug 15, 2021 4:03 pm

by Rynoth

Area 51% wrote:My money is on one good and one bad magnatron.

Remove your temporary short-circuit wires one at a time with a test run in between. If you remove a wire and the engine smooths out, you’ve found the good magnatron.

Good test, I had this thought also but was it running smooth when mags switch was off in first test? Edit: Watched your earlier video again at the 3 minute mark. The roughness definitely suggests 1 mag not shutting down when grounded.

You might only have 1 bad mag, and you’re firing on 2 cylinders only when both mags are grounded out. I’d still lean towards having both mags replaced though.

Edit: On further consideration, I think this is exactly what your EGT test is telling you. If you’re running on 2 cylinders only, the exhaust gasses are still going to make their way through the pipes and warm the other “cold” EGT thermocouples to a lesser extent.

Sidenote: I was taught in my early flight school days to always do a mag check just prior to every engine shutdown. A quick flip of all ignition switches OFF/ON at idle before killing the engine with mixture/fuel shutoff. I’m curious if this is standard practice for others (I believe it should be.)


Re: Cotton AeroVee 0795

Posted: Sun Aug 15, 2021 6:44 pm

by Bryan Cotton

Area 51% wrote:My money is on one good and one bad magnatron.

Remove your temporary short-circuit wires one at a time with a test run in between. If you remove a wire and the engine smooths out, you’ve found the good magnatron.

Great idea, thanks.


Re: Cotton AeroVee 0795

Posted: Sun Aug 15, 2021 10:10 pm

by Bryan Cotton

Randy/Area 51 for the win on this one.

With the top magnetron P lead disconnected, the bottom magnetron P lead shorted to ground, and the secondary ignition turned off, the motor ran good. This would indicate that the bottom magnetron was not turning off though its P lead was shorted to ground.
With the top magnetron P lead shorted to ground, and the bottom magnetron P lead disconnected, the engine ran terrible when the secondary was turned off. This would indicate the top magnetron P lead is able to shut off the magneto.


Re: Cotton AeroVee 0795

Posted: Mon Aug 16, 2021 9:27 am

by Bryan Cotton

Last night’s test run. Also Adam’s first time running the engine.

Also, we discovered that with the mixture all the way off, the engine still ran. I assume I just need to adjust my mixture travel, does that sound right?


Re: Cotton AeroVee 0795

Posted: Mon Aug 16, 2021 11:09 am

by pappas

Yeah, adjusting the mixture lever throw for full open and full close sounds like the most likely culprit. Some guys have had issues because they were not getting the fully open position correct. Sonex used to say 45 degrees on the mixture arm. Newer plans say a “minimum” of 45 degrees.


Re: Cotton AeroVee 0795

Posted: Mon Aug 16, 2021 11:50 am

by Bryan Cotton

Sonex is sending me a new magnetron. Too bad I didn’t think to put the bad one on the top! That would have been easier.

Thanks Lou for your comment on the mixture.


Re: Cotton AeroVee 0795

Posted: Mon Aug 16, 2021 4:43 pm

by pappas

My top mag melted itself about a year or so ago. I sent Kerry some pics and they sent me a replacement at n/c pronto. No complaints from me.


Re: Cotton AeroVee 0795

Posted: Mon Aug 16, 2021 11:12 pm

by Bryan Cotton

We set the secondary ignition timing today. It was waaaay advanced initially.

I went and set the prop so the top magnetron was lined up for firing, like in the initial setup for setting the secondary ignition statically. Then I painted a line on the flywheel and one of the gear teeth, and drew a line to match on the case.

We ran the engine with the timing light inductive clamp hooked on a magnetron plug wire. I had to erase the line with acetone and move it so they lined up when it was running and the timing light fired. Once I had that line good for the magnetrons, then we swapped the inductive pickup to the secondary ignition plug wire. It took a lot of tries. I think we really need a good way to hold the magnet ring from moving while you loosen, tighten, and move the prop. But, we finally got the secondary timing set pretty good.

I can’t shut off the mags yet, but the drop when I turned off the electronic ignition was 40 RPM. Seems like a good start.

I bought this timing light from Harbor Freight:
https://www.harborfreight.com/timing-li … 40963.html

It has a stupid feature that lets you adjust when the light fires. I recommend duct taping it to zero, else you will bump it and wonder what in the heck is going on.

Re: Cotton AeroVee 0795

Posted: Tue Aug 17, 2021 2:30 pm

by Bryan Cotton

Rynoth wrote:Edit: On further consideration, I think this is exactly what your EGT test is telling you. If you’re running on 2 cylinders only, the exhaust gasses are still going to make their way through the pipes and warm the other “cold” EGT thermocouples to a lesser extent.

I would expect the dead cylinder would be pumping cold air past the EGT in its exhaust pipe. How is the other cylinder going to pump hot air backwards through the pipe and into the engine?


Re: Cotton AeroVee 0795

Posted: Thu Aug 19, 2021 7:47 am

by Area 51%

Bryan Cotton wrote:

Rynoth wrote:Edit: On further consideration, I think this is exactly what your EGT test is telling you. If you’re running on 2 cylinders only, the exhaust gasses are still going to make their way through the pipes and warm the other “cold” EGT thermocouples to a lesser extent.

I would expect the dead cylinder would be pumping cold air past the EGT in its exhaust pipe. How is the other cylinder going to pump hot air backwards through the pipe and into the engine?

It would be interesting to have an EGT on the exit pipe of my air compressor. No combustion there either, but the pipe is too hot to keep your hand on.


Re: Cotton AeroVee 0795

Posted: Thu Aug 19, 2021 7:51 am

by Bryan Cotton

Area 51% wrote:It would be interesting to have an EGT on the exit pipe of my air compressor. No combustion there either, but the pipe is too hot to keep your hand on.

Interesting point. I would suspect the heat of compression is much less than the heat of combustion.


Re: Cotton AeroVee 0795

Posted: Thu Aug 19, 2021 8:32 am

by GraemeSmith

Rynoth wrote:Sidenote: I was taught in my early flight school days to always do a mag check just prior to every engine shutdown. A quick flip of all ignition switches OFF/ON at idle before killing the engine with mixture/fuel shutoff. I’m curious if this is standard practice for others (I believe it should be.)

A rare flight school. Most don’t want you doing this. If you don’t get it JUST right and get a fuel air charge pass through the cylinder and exhaust valve into the muffler - as the mags go hot again and the engine runs - the next exhaust cycle will ignite the charge in the muffler with a “pop” and you can blow the muffler off. Even if it’s new and takes the hit - it stresses it and shortens the life.

Rookie students rarely have the finesse to do it right. So it’s banned.

But it’s a very legitimate test if you can do it right and just “blip” it a fraction to check the mags are grounding.

Like I did just after flying on Tuesday and lo and behold - I have a hot mag…

If it’s not one thing… :slight_smile:


Re: Cotton AeroVee 0795

Posted: Thu Aug 19, 2021 1:32 pm

by Bryan Cotton

I was taught to check for a hot mag. I do it occasionally. Never blew up a muffler. Not much worry on a Sonex.

As a teenager, I was stuck behind a large truck on a large hill once in my '71 Olds Cutlass. Finally got a pass zone after cresting the hill. Went wide open, and passed the truck. Took my foot off the gas and it got stuck wide open. My first thought as I passed 90 MPH was to turn off the ignition. Then did some troubleshooting and discovered the floor mat had jammed the pedal. Ignition back on. That muffler blew in a spectacular fashion.

If it’s not one thing… :slight_smile:

Here’s hoping for you that it’s the top mag!


Re: Cotton AeroVee 0795

Posted: Thu Aug 19, 2021 8:01 pm

by Rynoth

GraemeSmith wrote:

Rynoth wrote:Sidenote: I was taught in my early flight school days to always do a mag check just prior to every engine shutdown. A quick flip of all ignition switches OFF/ON at idle before killing the engine with mixture/fuel shutoff. I’m curious if this is standard practice for others (I believe it should be.)

A rare flight school. Most don’t want you doing this. If you don’t get it JUST right and get a fuel air charge pass through the cylinder and exhaust valve into the muffler - as the mags go hot again and the engine runs - the next exhaust cycle will ignite the charge in the muffler with a “pop” and you can blow the muffler off. Even if it’s new and takes the hit - it stresses it and shortens the life.

Rookie students rarely have the finesse to do it right. So it’s banned.

But it’s a very legitimate test if you can do it right and just “blip” it a fraction to check the mags are grounding.

Like I did just after flying on Tuesday and lo and behold - I have a hot mag…

If it’s not one thing… :slight_smile:

Indeed, throttle should be fully idle (as closed as possible) and the “blip” should be as short as possible. I’ve never experienced a backfire in all my years though (granted I also have never flown an aircraft with a muffler.)

FWIW the flight school was Embry-Riddle Aeronautical University, not a small operation by any means.

The real trick in many aircraft is not letting the key get jammed when you go to “off” on the mags, since that’s also typically the key removal position.

Example of my mag shutdown check at 14:13 in my First Flight video:

https://youtu.be/D8Z_OK6SFh8?t=849


Re: Cotton AeroVee 0795

Posted: Sat Aug 28, 2021 1:17 pm

by Bryan Cotton

New magnatron installed, P lead works now. Issue closed.

A better idea than the blip: just let it shut off and air out.


Re: Cotton AeroVee 0795

Posted: Thu Apr 28, 2022 10:18 pm

by flyingbear

Why cant you shut off the mags>>? Defective? Mine were but Sonex knew it and made me pay for new ones.


Re: Cotton AeroVee 0795

Posted: Fri Apr 29, 2022 10:01 am

by Bryan Cotton

flyingbear wrote:Why cant you shut off the mags>>? Defective? Mine were but Sonex knew it and made me pay for new ones.

I had one defective mag. I am the original buyer and mine was replaced for free after I provided enough evidence that the mag was bad.


Re: Cotton AeroVee 0795

Posted: Sat Jul 02, 2022 3:44 pm

by Bryan Cotton

I’ve redone my sump. I got acorn nuts and drilled them for safety wire.

Re: Cotton AeroVee 0795

Posted: Sat Jul 02, 2022 3:50 pm

by Area 51%

If you drilled through the nut, you just guaranteed yourself an oil leak. The whole idea of the acorn nut is to stop any oil that gets past the sump threads. Enter the copper gaskets under (or on top of) the acorn nuts.


Re: Cotton AeroVee 0795

Posted: Sat Jul 02, 2022 5:24 pm

by Bryan Cotton

Area 51% wrote:If you drilled through the nut, you just guaranteed yourself an oil leak. The whole idea of the acorn nut is to stop any oil that gets past the sump threads. Enter the copper gaskets under (or on top of) the acorn nuts.

I drilled through the corner, not through the threaded hole in the middle.

Edit: had I drilled through the center, how could I have gotten the safety wire through?


Re: Cotton AeroVee 0795

Posted: Sat Jul 02, 2022 7:03 pm

by Area 51%

Presumably, the stud doesn’t go all the way to the bottom of the nut. If it does, the sump plate will leak due to lack of tension.
Good job with the corner engineering.


Re: Cotton AeroVee 0795

Posted: Sat Jul 02, 2022 8:30 pm

by Bryan Cotton

Area 51% wrote:Presumably, the stud doesn’t go all the way to the bottom of the nut. If it does, the sump plate will leak due to lack of tension.

I don’t think it does. The copper is squished a little bit not destroyed from following torque specs like last time. I used a nutdriver and did it by feel.


Re: Cotton AeroVee 0795

Posted: Wed Jul 06, 2022 3:47 pm

by Bryan Cotton

Update - no more oil puddle under the engine. Looks like success!


Re: Cotton AeroVee 0795

Posted: Thu Aug 04, 2022 2:17 pm

by Bryan Cotton

I’d edit that last post, but that would be dishonest. There is plenty of oil on the ground. Not from static sitting, but from when I run it. Those updates go in the “quest for the elusive dry aerovee” thread.

I think I might be running lean. I have high EGTs and little difference when I go lean and rich on the mixture. Unfortunately my nifty reversing linkages are in the way, so I have to pull my aerocarb out to make the adjustment. The manual says 1/8 to 1/2 turn. I’m thinking of shooting for 1/4 turn but would like to hear opinions from those with experience.


Re: Cotton AeroVee 0795

Posted: Thu Aug 04, 2022 6:09 pm

by Area 51%

You’ve just entered one of the most frustrating aspects of phase 1 testing. A little can go a long way…or make no difference at all. If you don’t yet have to lean to get full throttle, I’d start with 1/4 turn richer. It’s not likely you’re going to hit it right on the first try anyway, so go for an overshoot, then come back.

The frustration comes from turning the needle carrier 1/4 turn, only to have the setscrew muck-up your adjustment leaving you with a random setting.

If you don’t have one already, put a 3/16 ball bearing between the carrier and setscrew. It keeps the setscrew from turning the carrier.

You have my sympathy.


Re: Cotton AeroVee 0795

Posted: Sun Aug 07, 2022 10:35 pm

by Bryan Cotton

I finally understand the ball bearing thing. I’ll try that - someday. I did my 1/4 turn richer and it seems to run great, and the EGTs are now reasonable.

I think for now I’m not going to mess with it.


Re: Cotton AeroVee 0795

Posted: Sat Jun 29, 2024 8:48 pm

by Bryan Cotton

Screenshot_20240629-193824.png


Re: Cotton AeroVee 0795

Posted: Sun Jun 30, 2024 10:53 am

by Bryan Cotton

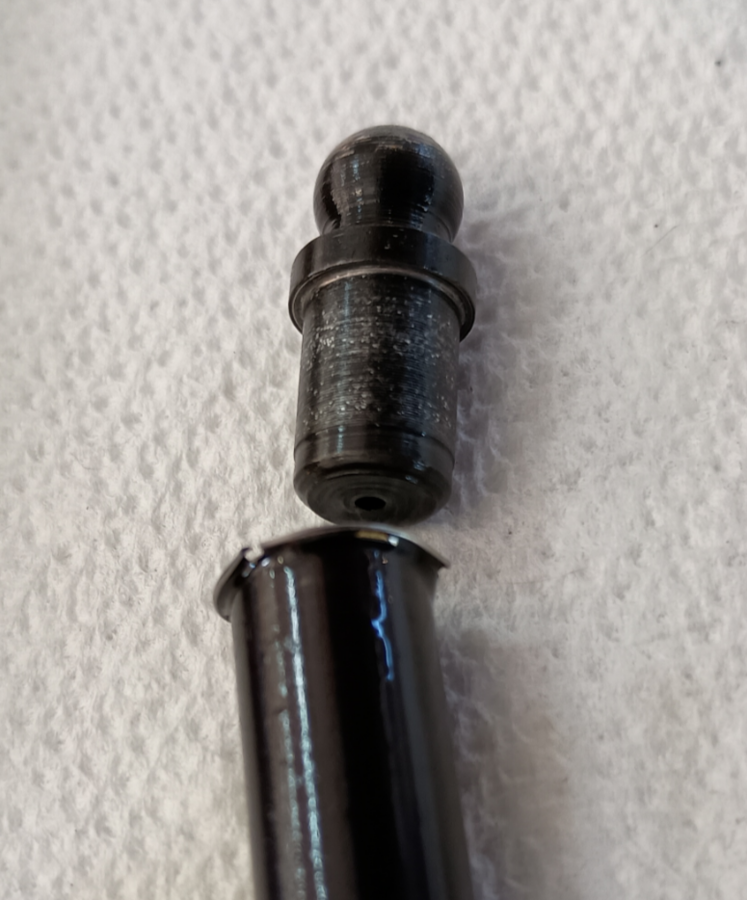
We have had a few findings and I’ll try and get some pictures later. Here is a short list though:

  1. One of the pushrod ends fell out when I removed it from the engine. The end of the tube looked beat up - there was a big burr on it.
  2. Our thrust shimming was bad. Looked like about 0.020" of clearance. Besides a lot of play, the crank web has polished into the case web a little.
  3. I think I posted pics in the other thread, but the #3 exhaust valve looked deformed where it contacts the seat. And, the #3 intake seat fell out of the head.

Re: Cotton AeroVee 0795

Posted: Sun Jun 30, 2024 2:12 pm

by Area 51%

Try this…You don’t need to have the crank installed in the case to set the end play. It’s easier to assemble the crank, bearing, shims, and flywheel on the bench and check the clearance with a feeler gauge there.

Did you remove the temper in the pushrod by heating it up to install the ends?


Re: Cotton AeroVee 0795

Posted: Sun Jun 30, 2024 2:18 pm

by Bryan Cotton

Area 51% wrote:Try this…You don’t need to have the crank installed in the case to set the end play. It’s easier to assemble the crank, bearing, shims, and flywheel on the bench and check the clearance with a feeler gauge there.

Did you remove the temper in the pushrod by heating it up to install the ends?

I set it to .005 last night. We did not heat our pushrods for installation. A local VW guy seems to think we should have.


Re: Cotton AeroVee 0795

Posted: Sun Jun 30, 2024 10:53 pm

by Bryan Cotton

Here is that bad pushrod:

ugly pushrod.png


Re: Cotton AeroVee 0795

Posted: Sun Jul 14, 2024 9:18 pm

by Bryan Cotton

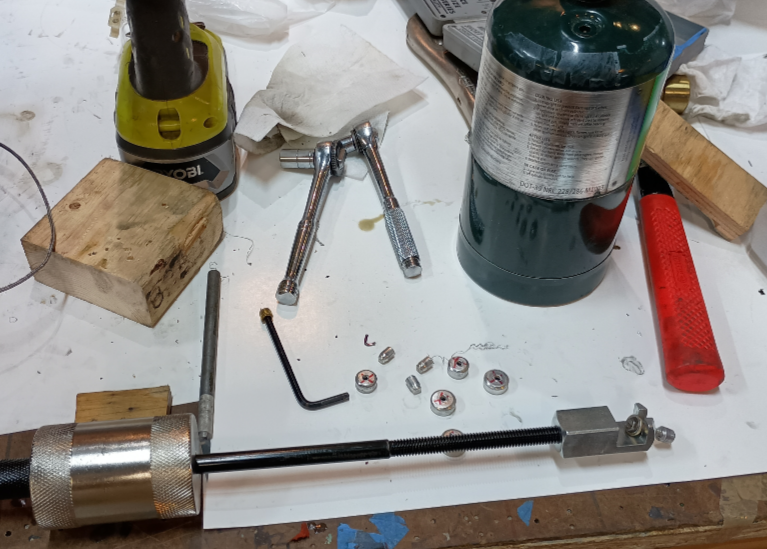
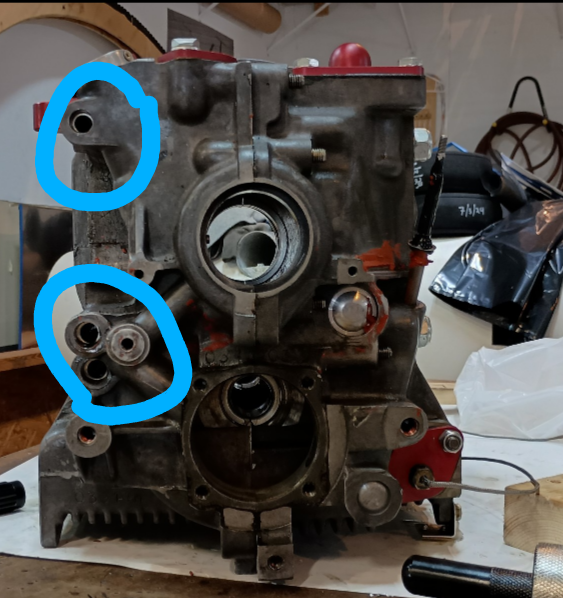
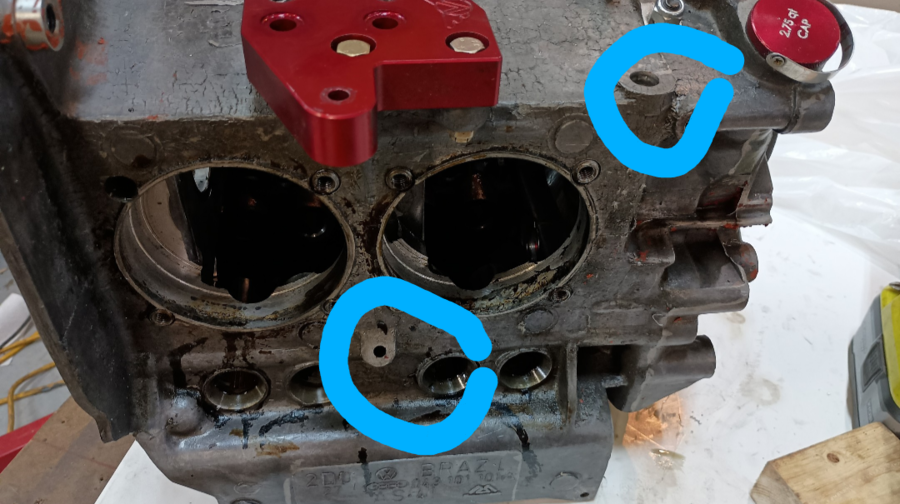
One of the things I’d like to figure out is why I can’t get our cruise oil pressure below 60 psi. So I’ve decided to pull the galley plugs and have a good look.


galley plugs out.png (1.11 MiB) Viewed 1017 times


galley plugs front.png (1.05 MiB) Viewed 1017 times

galley plugs side.png

I used this as a guide:
https://www.huelsmann.us/bugman/FilterTech.html

Sonex tech support said I shouldn’t pull the plugs. But I did anyway. Also I used this slide hammer from HF:
https://www.harborfreight.com/slide-ham … 56894.html
Worked great!

One interesting thing was the small plug on the front of the engine, where the oil pump out galley intersects the front bearing galley, had a pipe thread tap instead of a plug. I had to put some heat on the case to get it out. It was brass I think.


Re: Cotton AeroVee 0795

Posted: Mon Jul 15, 2024 12:16 am

by kmacht

I pulled the galley plugs on my case when I rebuilt the motor. There was actually quite a bit of metal shaving debris in there. I’m not sure it affected anything as the debris was packed at the ends where it wasn’t restricting flow but cleaning it all out provided some peace of mind.

Keith
#554


Re: Cotton AeroVee 0795

Posted: Mon Jul 15, 2024 9:59 am

by Area 51%

Bryan Cotton wrote:
One interesting thing was the small plug on the front of the engine, where the oil pump out galley intersects the front bearing galley, had a pipe thread tap instead of a plug. I had to put some heat on the case to get it out. It was brass I think.

Behind that pipe plug, there used to be a restrictor as delivered from VW. It’s typically removed to enhance the oil flow to the front bearing.

That’s right…I never throw anything away.


Re: Cotton AeroVee 0795

Posted: Mon Jul 15, 2024 7:41 pm

by Bryan Cotton

Area 51% wrote:
Behind that pipe plug, there used to be a restrictor as delivered from VW. It’s typically removed to enhance the oil flow to the front bearing.

That’s right…I never throw anything away.

So - I should remove it? I haven’t checked if my case has it yet.


Re: Cotton AeroVee 0795

Posted: Tue Jul 16, 2024 6:48 am

by Area 51%

If you have a pipe plug, the restrictor has more than likely already been taken out.
The stock blocks have a pressed-in plug in that location.


Re: Cotton AeroVee 0795

Posted: Tue Jul 16, 2024 6:53 am

by Area 51%

Another thing, The Aerovee assembly manual used to call for enlarging the oil supply hole in the nose bearing. Probably still does. When I pointed out to Sonex back in 2017 that my pre-assembled crank did not have the larger oil hole in the bearing, they said they discontinued that practice.

I removed the bearing and up-drilled the hole.


Re: Cotton AeroVee 0795

Posted: Fri Jul 19, 2024 9:51 am

by Bryan Cotton

My restrictor was out.

For those who are able to do the full flow mod without disassembling the case, I’m not worthy. There was no scary debris in the galleys before but there is now!

For now I’m just going to plug the holes. 3 down, 6 to go.

Re: Cotton AeroVee 0795

Posted: Tue Jul 30, 2024 2:50 pm

by Bryan Cotton

It’s much harder to put the motor on its nose in the drill press, so I drilled all 4 plugs by hand. Actually for the small plugs I went right to the 1/16 NPT tap without drilling. But I could not get the 3/8" NPT tap started. As I was getting frustrated I put it aside until after Oshkosh and ordered some 10MM bolts so I could get the case nose down on the drill press. What I did on the other side was to use the chuck to press/center the tap into the hole as I turned it. That worked great.

Here I’ve bolted an angle across a couple of 10MM holes that serve some purpose on the car. I clamped a second angle to the first one. I also found some nifty large flat head torx 6mm screws from my Saturn junk box and screwed them in by the crank exit/snout.

Here it is in the press.

I clamped those angles to the table and shimmed below the screws & snout. I made the screws level with the snout.

Lunchtime over - will tap it tonight.

I’d rather be lucky than good.


Re: Cotton AeroVee 0795

Posted: Tue Jul 30, 2024 10:49 pm

by Bryan Cotton

I’ve successfully tapped the last two oil galleys. Back:

Top:

I saw nothing scary in the galleys, so not sure what was causing my high oil pressure.

Doing this job in the drill press is key to making it go well.


Re: Cotton AeroVee 0795

Posted: Wed Jul 31, 2024 12:02 pm

by bvolcko38

How did your bearings and journals look? Did you plastigauge them?


Re: Cotton AeroVee 0795

Posted: Wed Jul 31, 2024 12:41 pm

by Bryan Cotton

bvolcko38 wrote:How did your bearings and journals look? Did you plastigauge them?

They looked ok. I did not plastigauge them.


Re: Cotton AeroVee 0795

Posted: Fri Aug 02, 2024 11:08 am

by Area 51%

Are you going to re-use your cam and lifters?

If not, there is a better option for the camshaft. To begin with, the names “Eagle” and “Engle” get confused a lot. To be clear, the cam named after the symbol of the U.S.A. is a CB Performance unit. The other, well, is just the other.

Engle has a cam available with nearly identical lift/duration/overlap characteristics. Pricier I’ll grant, but it’s advantage is it’s forged with flat spots to miss the connecting rods. The Aerovee assembly manual would have you assemble the engine with the Eagle cam, then rotate it and listen for contact between the cam and rod ends. If there is contact, simply disassemble the motor and grind the offending matter from the cam. No mention of how to actually check the clearance between the two.

My new Engle cam is sitting here awaiting employment @Area 51%


Re: Cotton AeroVee 0795

Posted: Fri Aug 02, 2024 12:11 pm

by Bryan Cotton

Area 51% wrote:Are you going to re-use your cam and lifters?
@Area 51%

Yep. I had no clearance issues in the first 270 hours.


Re: Cotton AeroVee 0795

Posted: Sat Aug 03, 2024 6:40 pm

by Bryan Cotton

I have a set of Great Plains intake manifolds I want to try.

I made spacers. Left a gap between the front and rear cylinder. Wondering if this will help balance the mixture.

Aeroconversions parts for comparison.


Re: Cotton AeroVee 0795

Posted: Sun Aug 04, 2024 7:17 am

by Area 51%

Stock VW manifolds had a slot machined between the intake ports. Quite possibly for that very reason.

I figured, if it’s good enough for VW, it’s good enough for me. I chiseled a groove between the holes on my Great Plains manifolds simply out of respect for the engineers at VW. No digital information down to the tenth of a degree, but my plugs were all very evenly colored.

If nothing else, it sure looks nice not having a square peg in a round hole. .


Re: Cotton AeroVee 0795

Posted: Sun Aug 04, 2024 9:39 am

by Bryan Cotton

How far did your groove go? All the way? Any pictures?

Area 51% wrote:If nothing else, it sure looks nice not having a square peg in a round hole.

Yeah that always bugged me.


Re: Cotton AeroVee 0795

Posted: Sun Aug 04, 2024 11:47 am

by Area 51%

It simply bridged the gap between the ports. 3/16 X 3/16 slot comes to mind. No pictures and I can’t seem to lay my hands on them, but I know they are in the 10lb pile somewhere in this 5lb bag I call a workshop.

Re: Cotton AeroVee 0795

Posted: Sun Aug 04, 2024 11:48 am

by Bryan Cotton

From:


Re: Cotton AeroVee 0795

Posted: Sun Aug 04, 2024 11:51 am

by Area 51%

Yep…just like that.


Re: Cotton AeroVee 0795

Posted: Mon Aug 05, 2024 10:20 pm

by Bryan Cotton


Re: Cotton AeroVee 0795

Posted: Fri Aug 09, 2024 11:03 pm

by Bryan Cotton


Re: Cotton AeroVee 0795

Posted: Sat Aug 10, 2024 9:12 am

by bvolcko38

Are those your intake manifolds? Did you modify them with that notch?


Re: Cotton AeroVee 0795

Posted: Sat Aug 10, 2024 9:30 am

by Bryan Cotton

bvolcko38 wrote:Are those your intake manifolds? Did you modify them with that notch?

Yes to both