Alternator/Fuel pump
Posted: Thu Jan 14, 2021 5:24 pm
by Wingman
I purchased this Sonex that the previous owner had just installed an SDS EFI system on. He only flew it a few hours before selling it. It’s a good upgrade in terms of performance. My engine at “static” is pulling almost 100 RPM more than “book”.
My issue is the electric only fuel pumps. The system requires two, but runs on one. (back-up) This system continuously draws about 9 amps of power. 4.5-5 for the pump and another 4 amps for the EFI system. This along with the normal electrical load of radio, transponder and other puts such a load on the 20 amp alternator that it barely keeps up, let alone recharge the battery. It would take about 1.5 to 2 hours at cruise power just to replenish what gets sucked out during start up taxi and runup.
I am seeking input on either a lower draw electric pump that will put out 40 psi (better yet mechanical drive pump) or a bigger alternator. Has anyone tried adapting a motorcycle stator/rotor system to one of these AeroVee engines? Those will put put 50 amps!
Appreciate any feedback.
Re: Alternator/Fuel pump
Posted: Thu Jan 14, 2021 5:46 pm
by sonex892.
This recent topic might be of interest
viewtopic.php?f=7&t=5937&hilit=alternator
Re: Alternator/Fuel pump
Posted: Thu Jan 14, 2021 7:32 pm
by lakespookie
Two things can help you 1. moding the aircraft to have an alternator like the linked post I originally made that post and am planning to go that route with a 50 Amp Alternator. otherwise the biggest savings would be going with lower power coils but honestly the alternator mod is probably the best option and it would be easier in your case since you will not need to use the stock ignition at all since you are running the SDS EFI system assuming you also have the ignition system they offer.
Re: Alternator/Fuel pump
Posted: Fri Jan 15, 2021 10:01 am
by GordonTurner
Without knowing the details I can make a couple of suggestions for direction. Easiest is install a PWM motor controller on the primary pump. Note that this pump should also have an oil pressure cutoff switch so it will stop pumping in the event of a crash. Or a g switch, but I believe those are more expensive. https://www.pegasusautoracing.com/produ … p?RecID=87
With the pwm you can dial back the output of the pump motor to provide the pressure and flow you need with minimum current. Do not try to control a motor with a resistance controller.
For more power, does your motor have provision fir a belt driven alternator? This is the way to get the most power including at idle. Second choice would be a three phase permanent magnet generator, basically the big version of what you have. I think this is what you are referring to. You will also need the correct rectifier/voltage regulator.
Best of luck, keep us informed. Gordon
Re: Alternator/Fuel pump
Posted: Mon Jan 18, 2021 12:21 pm
by Wingman
Thanks for the feedback everyone. I’m looking into Gordon’s suggestion of the pump motor controller, but I think I may pursue the bigger permanent magnet generator adapted from a motorcycle use. I really don’t want to add the weight of a 40-50 amp alternator because I am already pushing the forward CG limit as is.
Re: Alternator/Fuel pump
Posted: Tue Jan 19, 2021 10:36 pm
by lakespookie
Keep us updated on how that goes if its a good fit and doesnt have temp problems it gives us glass guys another power option.
Re: Alternator/Fuel pump
Posted: Tue Jan 19, 2021 10:36 pm
by lakespookie
Keep us updated on how that goes if its a good fit and doesnt have temp problems it gives us glass guys another power option.
Re: Alternator/Fuel pump
Posted: Wed Apr 14, 2021 10:38 am
by Wingman
Just wanted to post an update on this issue. I am still in search of a flywheel alternator option that will fit into the AeroVee aft case. This is not proving to be easy because Sonex used what is basically a lawnmower engine alternator that is quite small. The motorcycle flywheel alternator systems that are 3 phase can easily put out 50 amps, even 25 amps at idle. But, the stator/rotor are much larger in diameter and won’t fit in the aft case without some serious modification to the aluminum mounting plate. I really wish Sonex offered something bigger, but multiple emails and contact with them pretty much tell me we’re on our own with this issue.
Meanwhile, I am very much enjoying flying this great little airplane. I just don’t wander far from home yet due to this charging problem. The 20 amp system barely keeps up at cruise and is loosing the battle at anything below 2400 RPM. Makes for an immediate emergency landing if/when this alternator gives out due to my electric only fuel pump.
Blue skies all!
Re: Alternator/Fuel pump
Posted: Fri Apr 16, 2021 9:34 am
by n307tw
It would be interesting if one of the Aerovee/Aerovee Turbo guys could get their hands on a prop hub and develop a new version that has an integrated pulley to drive an external alternator on the “front”. Not sure if that would put too much force on the end of the engine that is driving the prop but it certainly could be an option. There are some talented people in our community that are great with solid works so maybe there will be a design sometime in the future. The lack of electrical output from the Aerovee is one of the reasons that drove me to the 65 amp alternator on the Aeromomentum. Either way I will follow this thread as I know this will definitely help other builders.
Re: Alternator/Fuel pump
Posted: Wed Jun 23, 2021 4:27 pm
by Wingman
I came up with a working fix for the inadequate 20 Amp AeroVee alternator. Here is what I did.
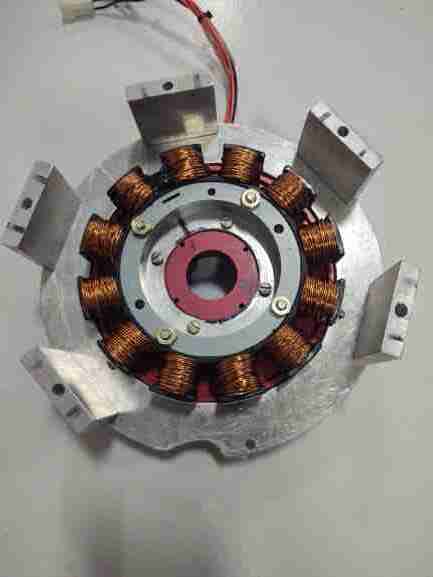
I purchased an Ultima 32 Amp Heavy Duty charging system. (used on late 90’s to early 2000’s Harley Sportster). This included a new regulator. It is quite a bit bigger so required some Yankee engineering. Guess that’s why we fly “experimental” aircraft!
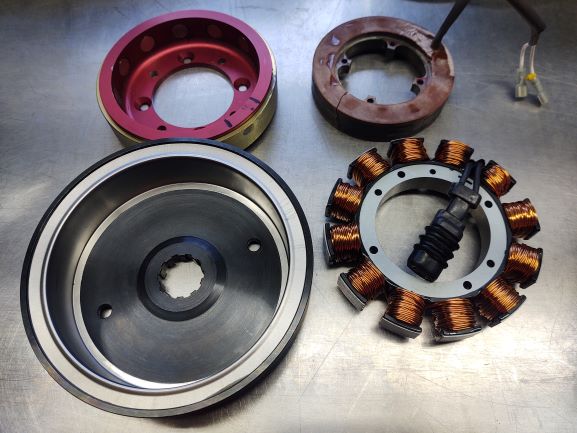
Old vs New.jpg (51.9 KiB) Viewed 10761 times
I purchase a 1.5" thick spacer to get the rotor to run outside of the accessory case.
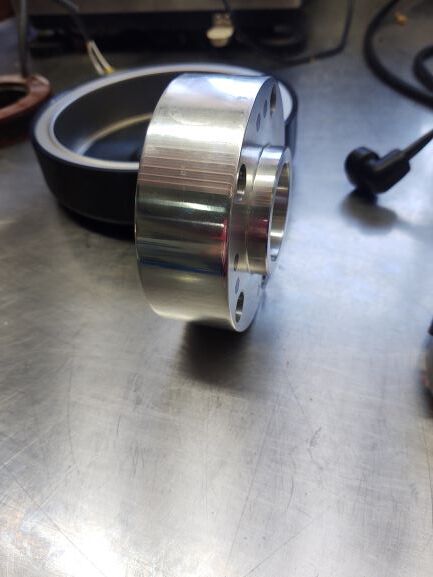
Spacer .jpg (30.74 KiB) Viewed 10761 times
This spacer had a flange on one side that I had the center of the rotor machined out to fit over. This helped to keep everything concentric. (VERY important) I then drilled the holes through the rotor and spacer to match the ones in the original rotor so it would all attach to the crankshaft as did the original. This was the most difficult part of the operation. Keeping everything concentric is critical so there are no bad vibrations. Attach the rotor to the flywheel first using high grade machine screws.
Rotor Attached (2).jpg (50.19 KiB) Viewed 10761 times
Then attach the original E-mag trigger plate and shaft to/through the rotor with longer (again) high grade structural screws that go all the way into the flywheel.
E-mag trigger shaft.jpg (40.29 KiB) Viewed 10761 times
I fabricated an outer and inner ring to attach the new stator and E-mag plate to the accessory case. I had to make 1.7" spacers to attach to this outer ring to get it to clear the larger new rotor.
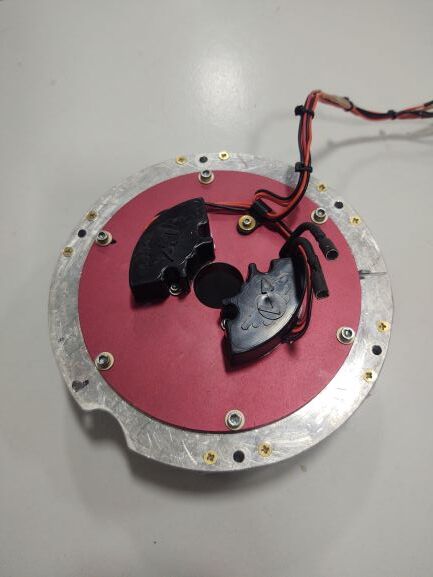
E-mag adapter ring .jpg (26.91 KiB) Viewed 10761 times
Stator adapter 2.jpg (13.29 KiB) Viewed 10652 times
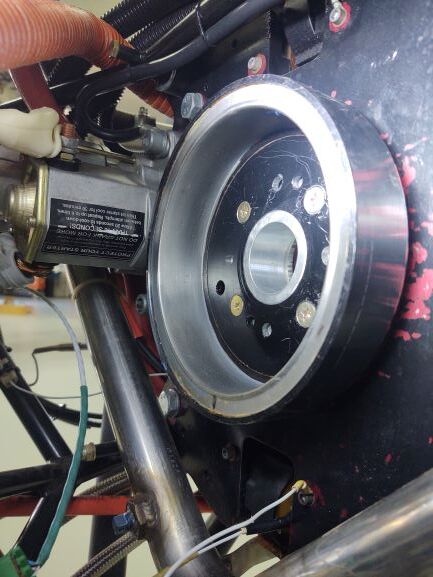
I lined everything up and drilled/tapped holes into the accessory case to secure the stator/E-mag assembly to the case. Again, assuring concentricity is critical. Make sure everything rotates without any contact issues.

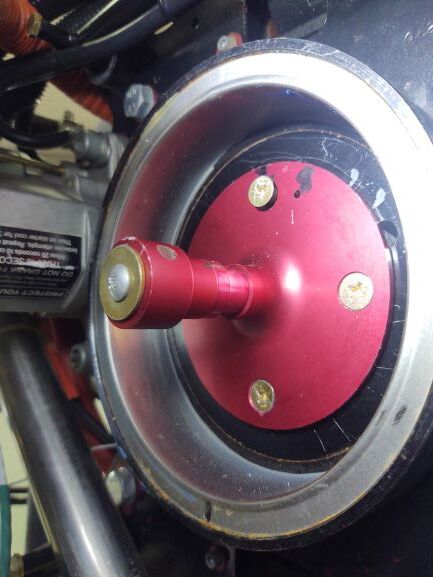
Final install .jpg (48.58 KiB) Viewed 10761 times
Another note: I had to rotate the starter 180 degrees so the drive unit would clear the larger rotor.
I now have 13.0 volts at idle and 14.2 volts at any RPM above 1500. I’m happy! My plane is happy!
PLEASE READ THIS! You can do what I did, but I would highly recommend that you pull your engine, remove the accessory plate (X-plate) and mill that out to fit the larger rotor inside the case as with the original. Doing this on the aircraft was far more work and very difficult to keep everything concentric and lined up. My thought was to do this for now and then mill the plate out the next time I have the engine off and make it more professional at that point. Take my advice and do it right from the beginning. This took me weeks when I could have done it in days had I just pulled the engine.
Re: Alternator/Fuel pump
Posted: Wed Jun 23, 2021 4:30 pm
by Wingman
Finally figured out how to get the pictures in the description so see previous post for those.
Re: Alternator/Fuel pump
Posted: Wed Jun 23, 2021 4:43 pm
by Wingman
A detail I forgot to address. I had to rotate the starter 180 degrees to make the starter drive clear the larger rotor. Another good reason to pull the case and di it right from the beginning.
Re: Alternator/Fuel pump
Posted: Fri Jun 25, 2021 12:51 am
by phenry
Wingman,
That is a beautiful and adaptive solution to a real problem. I am very impressed.
Re: Alternator/Fuel pump
Posted: Fri Jun 25, 2021 5:20 pm
by Wingman
Thanks for the encouragement Peter. I really hope others will use this solution. I have about 2 flight hours on it since completion a few days ago and all is going well. I now feel like I can venture off cross country without that nagging feeling that I may have an emergency at any moment when the alternator gives out due to being overloaded.
Re: Alternator/Fuel pump
Posted: Fri Jun 25, 2021 6:27 pm
by Bryan Cotton
Hey Wingman,
Sounds cool - but I can’t see the picture! Interested to see your work though.
Re: Alternator/Fuel pump
Posted: Sat Jun 26, 2021 11:11 pm
by Wingman
Hi Bryan. Check one of the earlier posts about my upgrade. It has all the pictures including the final install.
Re: Alternator/Fuel pump
Posted: Wed Dec 15, 2021 11:28 am
by Wingman
Update: I now have over 30 hours on this alternator upgrade and it is working perfectly. I am so glad I went through the effort to make this work. I now have a dependable cross-country plane with good electrical reserve power.
Re: Alternator/Fuel pump
Posted: Wed Apr 20, 2022 8:45 pm
by Wingman
Just thought I should post an update on this alternator upgrade thread. I now have over 30 hours since doing this project. It’s been a very cold winter here in Minnesota so didn’t get to fly it much. It’s still working flawlessly with no vibration issues and no movement of my self engineered set up. I am glad I did this project, but still plan to mill out the X-plate to fit the larger rotor the next time I have to pull the engine. Will make a much cleaner installation and reduce a bit of weight.
Re: Alternator/Fuel pump
Posted: Thu Mar 09, 2023 11:17 pm
by tps8903
Wingman wrote:Just thought I should post an update on this alternator upgrade thread. I now have over 30 hours since doing this project. It’s been a very cold winter here in Minnesota so didn’t get to fly it much. It’s still working flawlessly with no vibration issues and no movement of my self engineered set up. I am glad I did this project, but still plan to mill out the X-plate to fit the larger rotor the next time I have to pull the engine. Will make a much cleaner installation and reduce a bit of weight.
This seems like a great idea. I might look into doing this the first time I have to remove the engine from the plane.
On a side note, does anyone know where Sonex sources the stator? I can’t seem to match it.
Re: Alternator/Fuel pump
Posted: Fri Mar 10, 2023 7:30 pm
by BRS
The SDS is a good system. I’ve run it on a Subaru EJ, Rotax 914, and now a Lyc IO-360. They all idled and made power very smoothly. Be sure not to put off checking the huge fuel filters each year (ask me how know).
Did you ever call them and ask (Ross) if there was anything you could do to reduce the current requirements since you have a much smaller engine than what it can actually handle. I did notice you are not using the ignition - right? That save a few amps.
Would love to do this one day to my Revmaster.
Re: Alternator/Fuel pump
Posted: Sat Mar 11, 2023 1:00 am
by Dave Wolfe
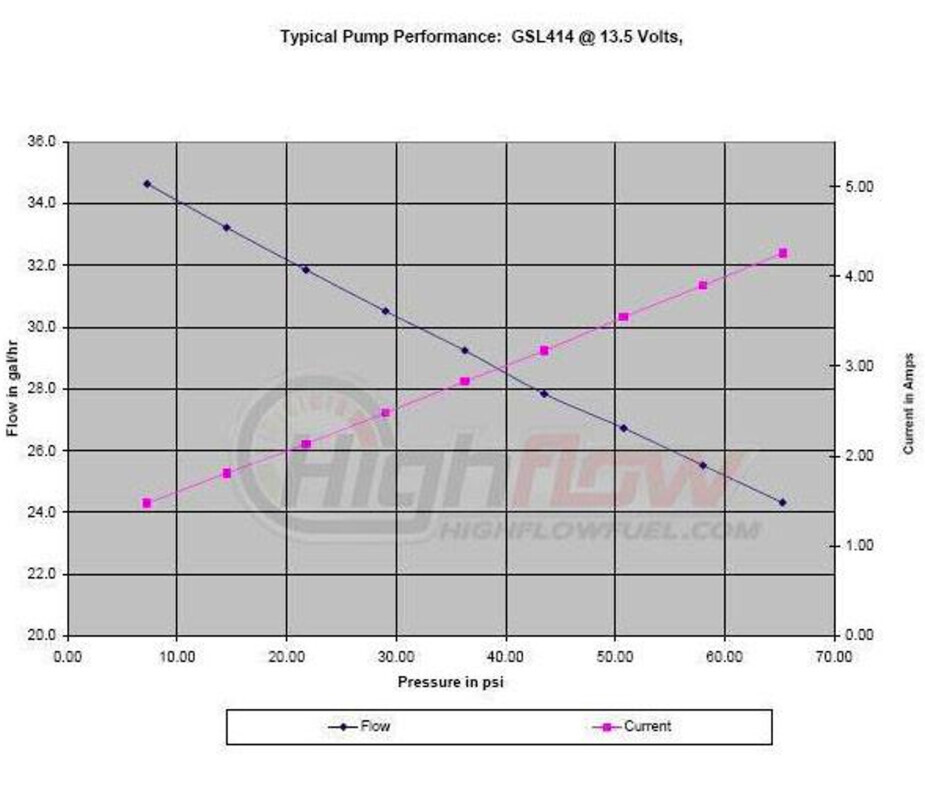
The walbro gsl 414 gets you down to 3A per pump.
Re: Alternator/Fuel pump
Posted: Wed Dec 13, 2023 2:30 pm
by kmacht
I stumbled across this thread while looking for a larger alternator solution for the aerovee and just wanted to make a comment about milling the adaptor plate out for the larger stator rather than using a spacer. Doing so will move the rotor closer to the crank but it won’t keep you from having to still make spacers and an adaptor for the trigger plate and moving the trigger magnets further out. The new rotor is not only a larger diameter but is also quite a bit wider/thicker as well so just milling the adaptor plate won’t work as the part sticks out too far.
To ensure concentricity I turned a flange on the ~1.5" spacer on both sides. One centers up the new rotor and the other engages both the flywheel as well as the crankshaft adaptor that’s held on with the gland nut. This makes it so everything from the crank to to the rotor is concentric when assembled.
I’m still working on mounting the trigger magnet plate but am weighing parts while I go and the larger alternator and adaptor pieces will add around 5.3 pounds above the stock aerovee assembled weight. I put a bore through the center of the 1.5" spacer to cut some weight and likely could have taken a little more off the 4" O.D. but am happy with being around 5lbs and didn’t want to push it.
Once I finish and do some flight testing next year I will post some 3d models of the adaptor parts if anyone else wants to make them. I have an old manual mill and lathe that I used to make the parts but there are plenty of companies out there that will make parts for you if you provide them the model.
Keith
#554
Re: Alternator/Fuel pump
Posted: Thu Dec 14, 2023 10:42 am
by Wingman
Keith,
Glad to see you are giving this a try. You are correct that one still needs to make a spacer/adapter plate for the mag trigger plate. If you look at my pictures, you can see I did that also. My suggestion to mill out the engine mounting plate was just to get it all closer to the engine rather than being completely aft of the plate. My thought is that it would reduce some of the added weight also, which you have confirmed by your indicated weights. When I reweighed mine after completion, I added almost 7 Lbs. Still better than an automotive alternator but too heavy for the Sonex.
Mine is still running flawlessly and the extra amps have been adequate for all of my equipment with some to spare. With all electrical equipment on at once you will hear the load on the engine. It creates a slight drop in RPM.
I will look forward to seeing your improved version. sounds like you are putting more engineering into than I did.
MN Wingman
Re: Alternator/Fuel pump
Posted: Thu Dec 21, 2023 10:55 am
by kmacht
I tried messaging you but the pm system doesn’t seem to work on this site. For the voltage regulator did you use the one that came with the new rotor/stator or did you use something different?
Re: Alternator/Fuel pump
Posted: Fri Dec 22, 2023 3:53 pm
by Wingman
I used the one that came with the rotor/stator. It seems to be doing a fine job. Mine runs right at 14 volts at cruise power and anything above about 1800 RPM.
Re: Alternator/Fuel pump
Posted: Fri Dec 22, 2023 4:09 pm
by Bryan Cotton
kmacht wrote:I tried messaging you but the pm system doesn’t seem to work on this site. For the voltage regulator did you use the one that came with the new rotor/stator or did you use something different?
It works for me!
Re: Alternator/Fuel pump
Posted: Sat Dec 30, 2023 8:43 am
by kmacht
Not sure what’s up with the PMs but for me they just sit in the outbox and never actually send.
I finished up mounting the alternator yesterday. I just need to machine a longer trigger magnet holder of some sort. I posted some additional pictures over on the Facebook group.
 Viewed 4648 times")
Re: Alternator/Fuel pump
Posted: Sat Jan 20, 2024 3:11 pm
by Wingman
Nice! That’s looking very similar to my setup. It would appear you are installing all aft of the X-plate as well? The picture looks like you haven’t milled out the X-plate either. It will work fine this way.
I’m getting ready to pull my engine due to a low oil pressure issue that I suspect is an internal case problem. While I have it off I am going to get my X-plate milled out so I can mount the rotor right to the crank. I’ll post more pictures after I get that done. Probably won’t be done until late spring or early summer.
Re: Alternator/Fuel pump
Posted: Sun Jan 21, 2024 9:43 am
by kmacht
I considered milling the x plate but it would have left very little material between the alternator hole and the starter hole. That web there takes a lot of the bending force from the upper right engine mount and I wasn’t comfortable with how little left there was going to be. The rotor is also too wide and would still need the standoffs from the x plate to mount the stator. To get around the concentricity issues I turned the flanges on the spacer to be a slight slip fit to the crank flange, flywheel, and rotor and then drilled the 8 holes all together as a single assembly on the mill using a rotary table. The whole assembly runs true within .002.
Keith
#554
Re: Alternator/Fuel pump
Posted: Sun Jan 21, 2024 5:46 pm
by Wingman
Very good! You’re probably correct regarding the milling out of the plate. I haven’t measured it to see how much would be left after enlarging the opening. I’m glad you considered that. Now we know.
The spacer I used also has a flange that helped with alignment. I drilled mine just with a drill press rather than using a milling machine. Mine is also running about.002-.003 within true. When I had the rotor milled out to fit the spacer flange, the rotor itself seemed to be about 2 mills out of round.
That should run fine for you. I don’t have any noticable vibration from mine.
On a side note, I’m currently pulling my engine apart for a low oil pressure issue. I think I have a flawed case. I’m losing pressure somewhere internally. I’ve been through everything else, so…?